3. Books
A book is the basic unit of content distributed in Handbook X. You compose content by adding sections (PDF, images, videos, web links, etc.) within a book.
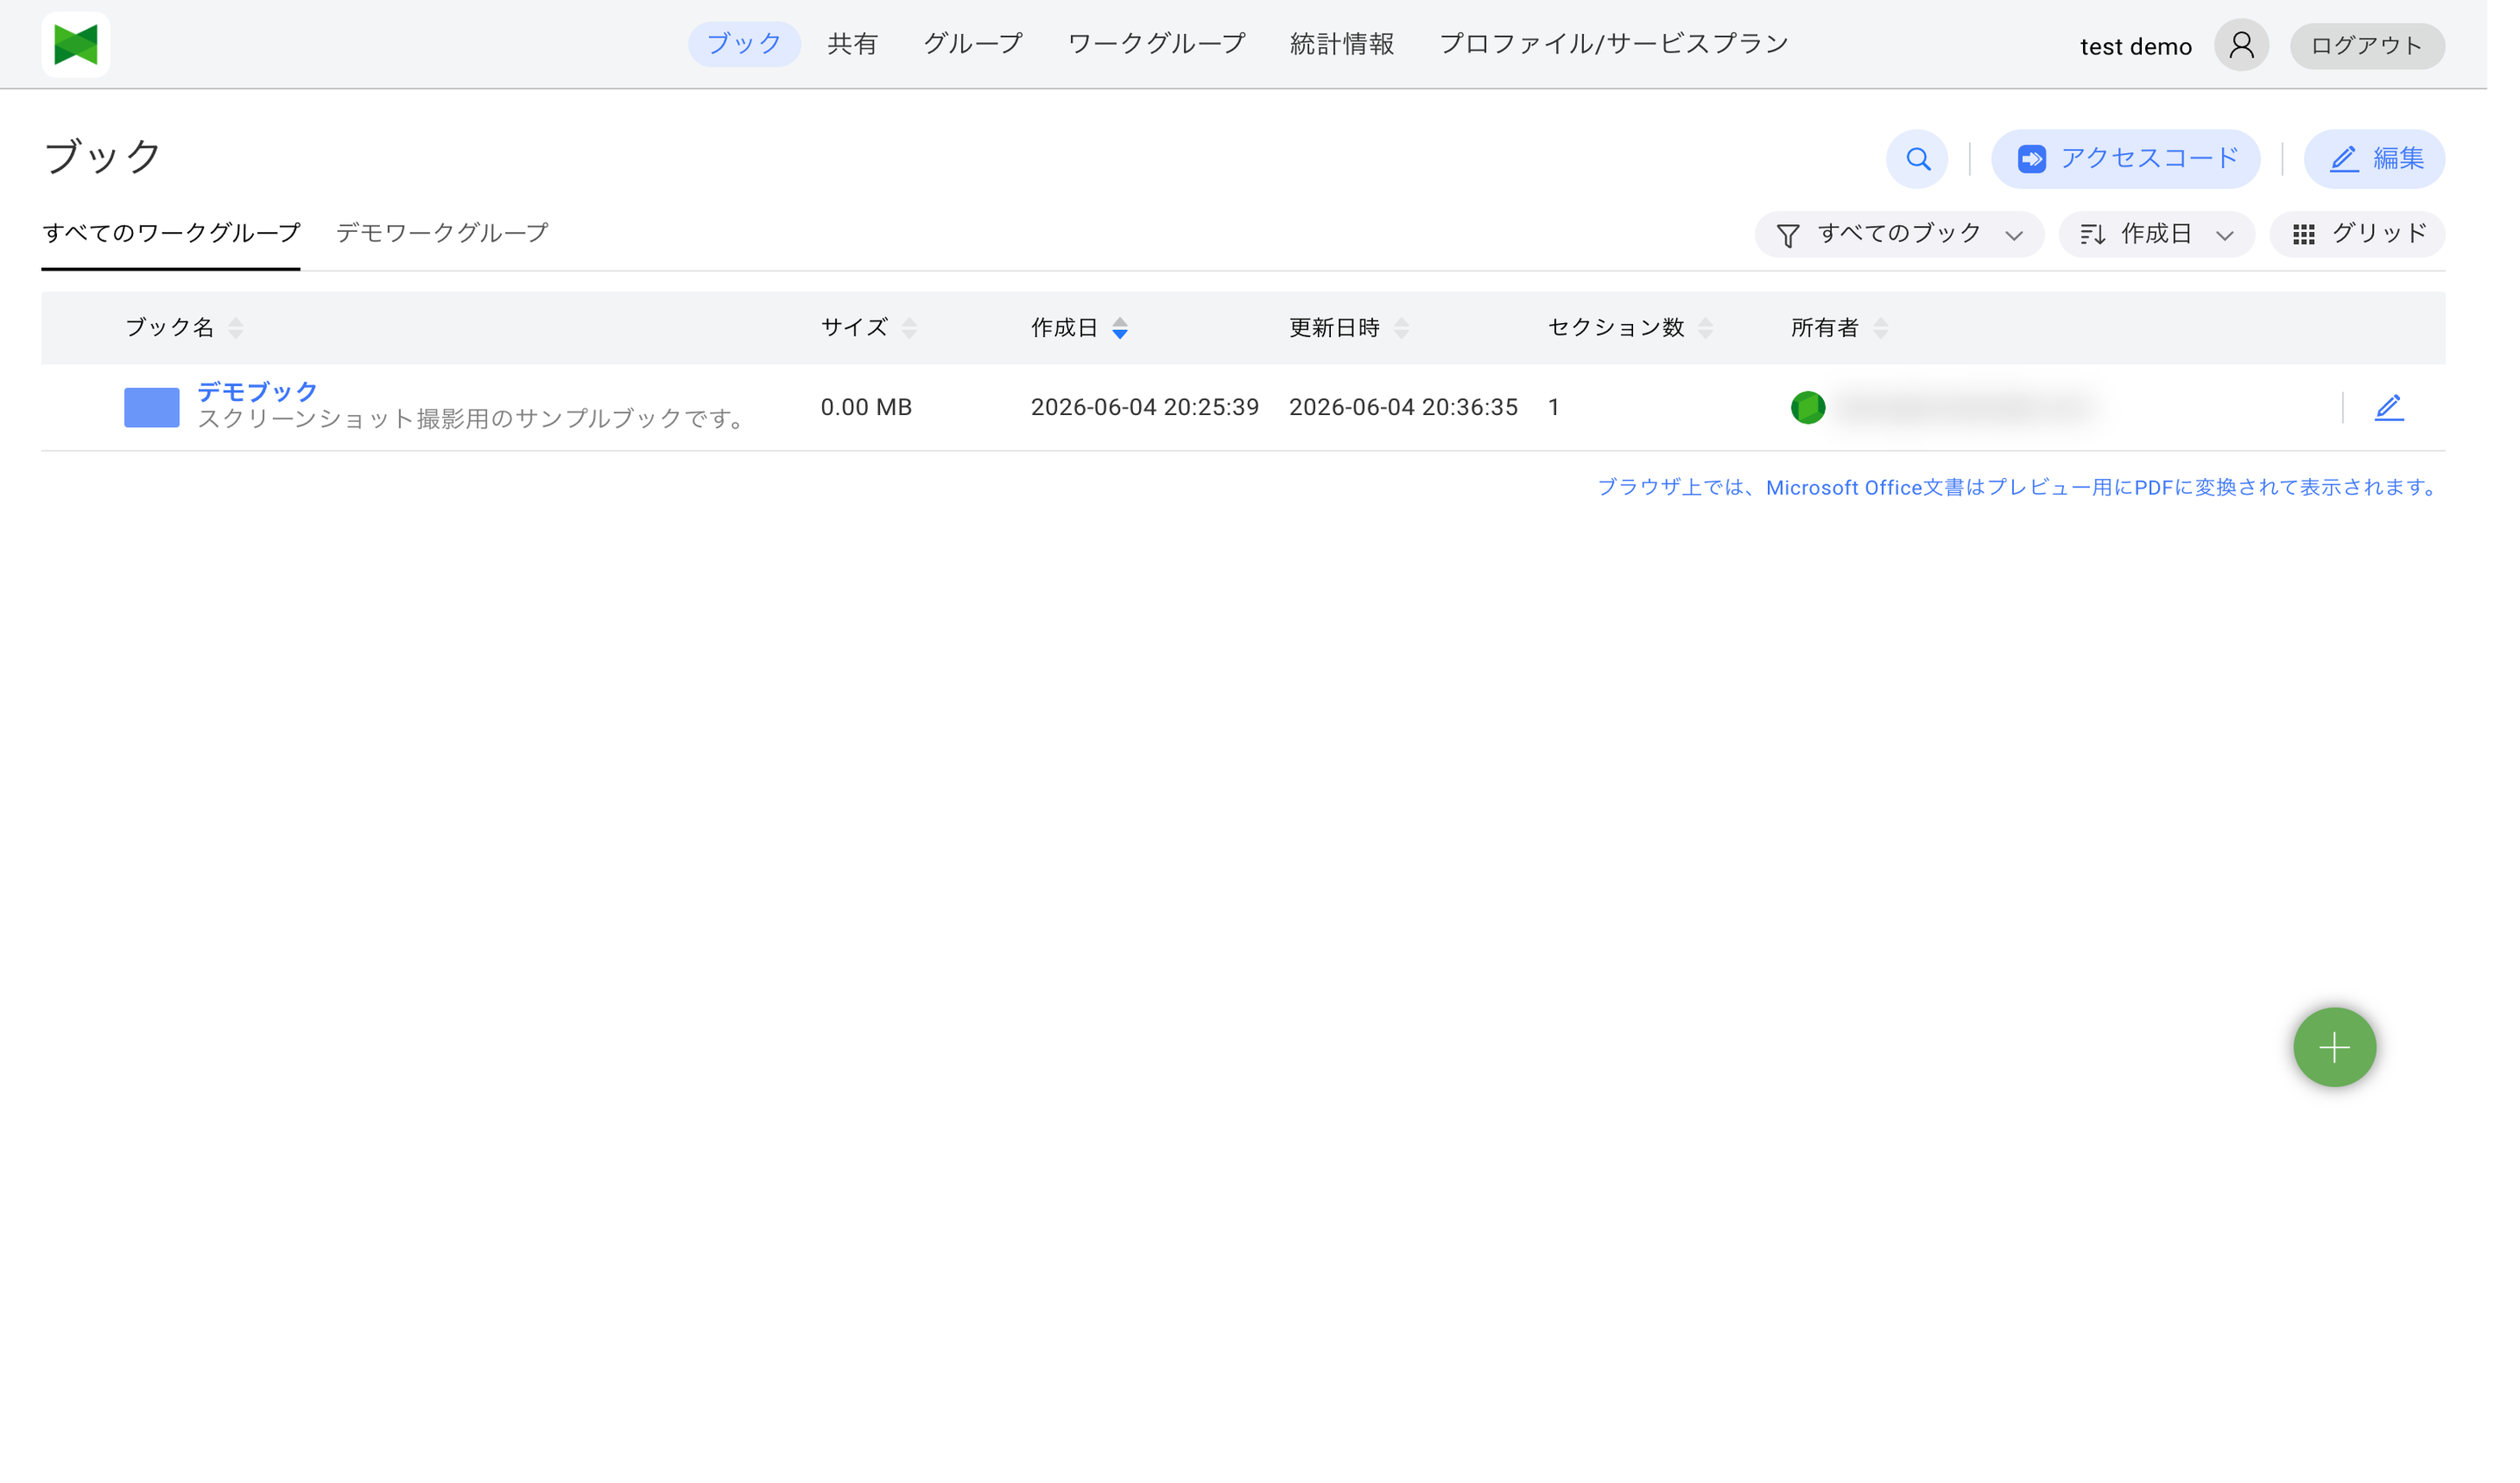
3.1 Book List
The book list is the first screen displayed after login.
Display Items
| Item | Description |
|---|---|
| Book Name | Name and description of the book |
| Size | Total size of content in the book |
| Create Date | Date and time the book was created |
| Updated | Date and time the book was last updated |
| Number of Sections | Number of sections in the book |
| Owner | Owner of the book |
Sorting
Click on any column header to sort by that column. Clicking toggles between ascending and descending order.
Selecting Books
You can select books you own by clicking the checkbox. Multiple selection enables bulk operations such as batch removal. Checkbox-based multiple selection is performed in Edit mode (see the next section).
3.1.1 View Mode and Edit Mode
The book list is operated by switching between two display modes: View mode and Edit mode.
View mode (default)
Right after opening the book list, you are in View mode. The toolbar at the top right shows the following buttons and selects:
- Books to display: Filter the list by sharing status (see 3.1.2 "Books to display" filter)
- Size: Select that switches the cell size in grid view
- Sort: Select that switches the sort order
- List / Grid: Toggle between list view and grid view
- Access Code: Register an access code (see 3.7 Access Code)
- Edit: Switch to Edit mode
In this mode you can perform viewing operations such as clicking a book to open it or sorting by column header. Hovering on the right end of each row reveals Edit / Remove icons that act on a single book.
Note: The Books to display, Size, and Sort selects show the currently selected value as the button label. Clicking a select opens a dropdown whose header shows the section title (e.g. "Books to display").
Edit mode
Clicking the Edit button at the top right switches to Edit mode, and the toolbar changes to:
- Remove: Bulk-remove the selected books
- Transfer Owner: Change the owner of the selected books (see 3.6 Changing Book Owner)
- Export Section URLs: Export section URLs of the selected books
- Done: Return to View mode
In Edit mode, a checkbox appears at the start of each row, and you can select multiple books for bulk operations. Once at least one book is selected, N selected is shown at the top of the screen and the actions above become available.
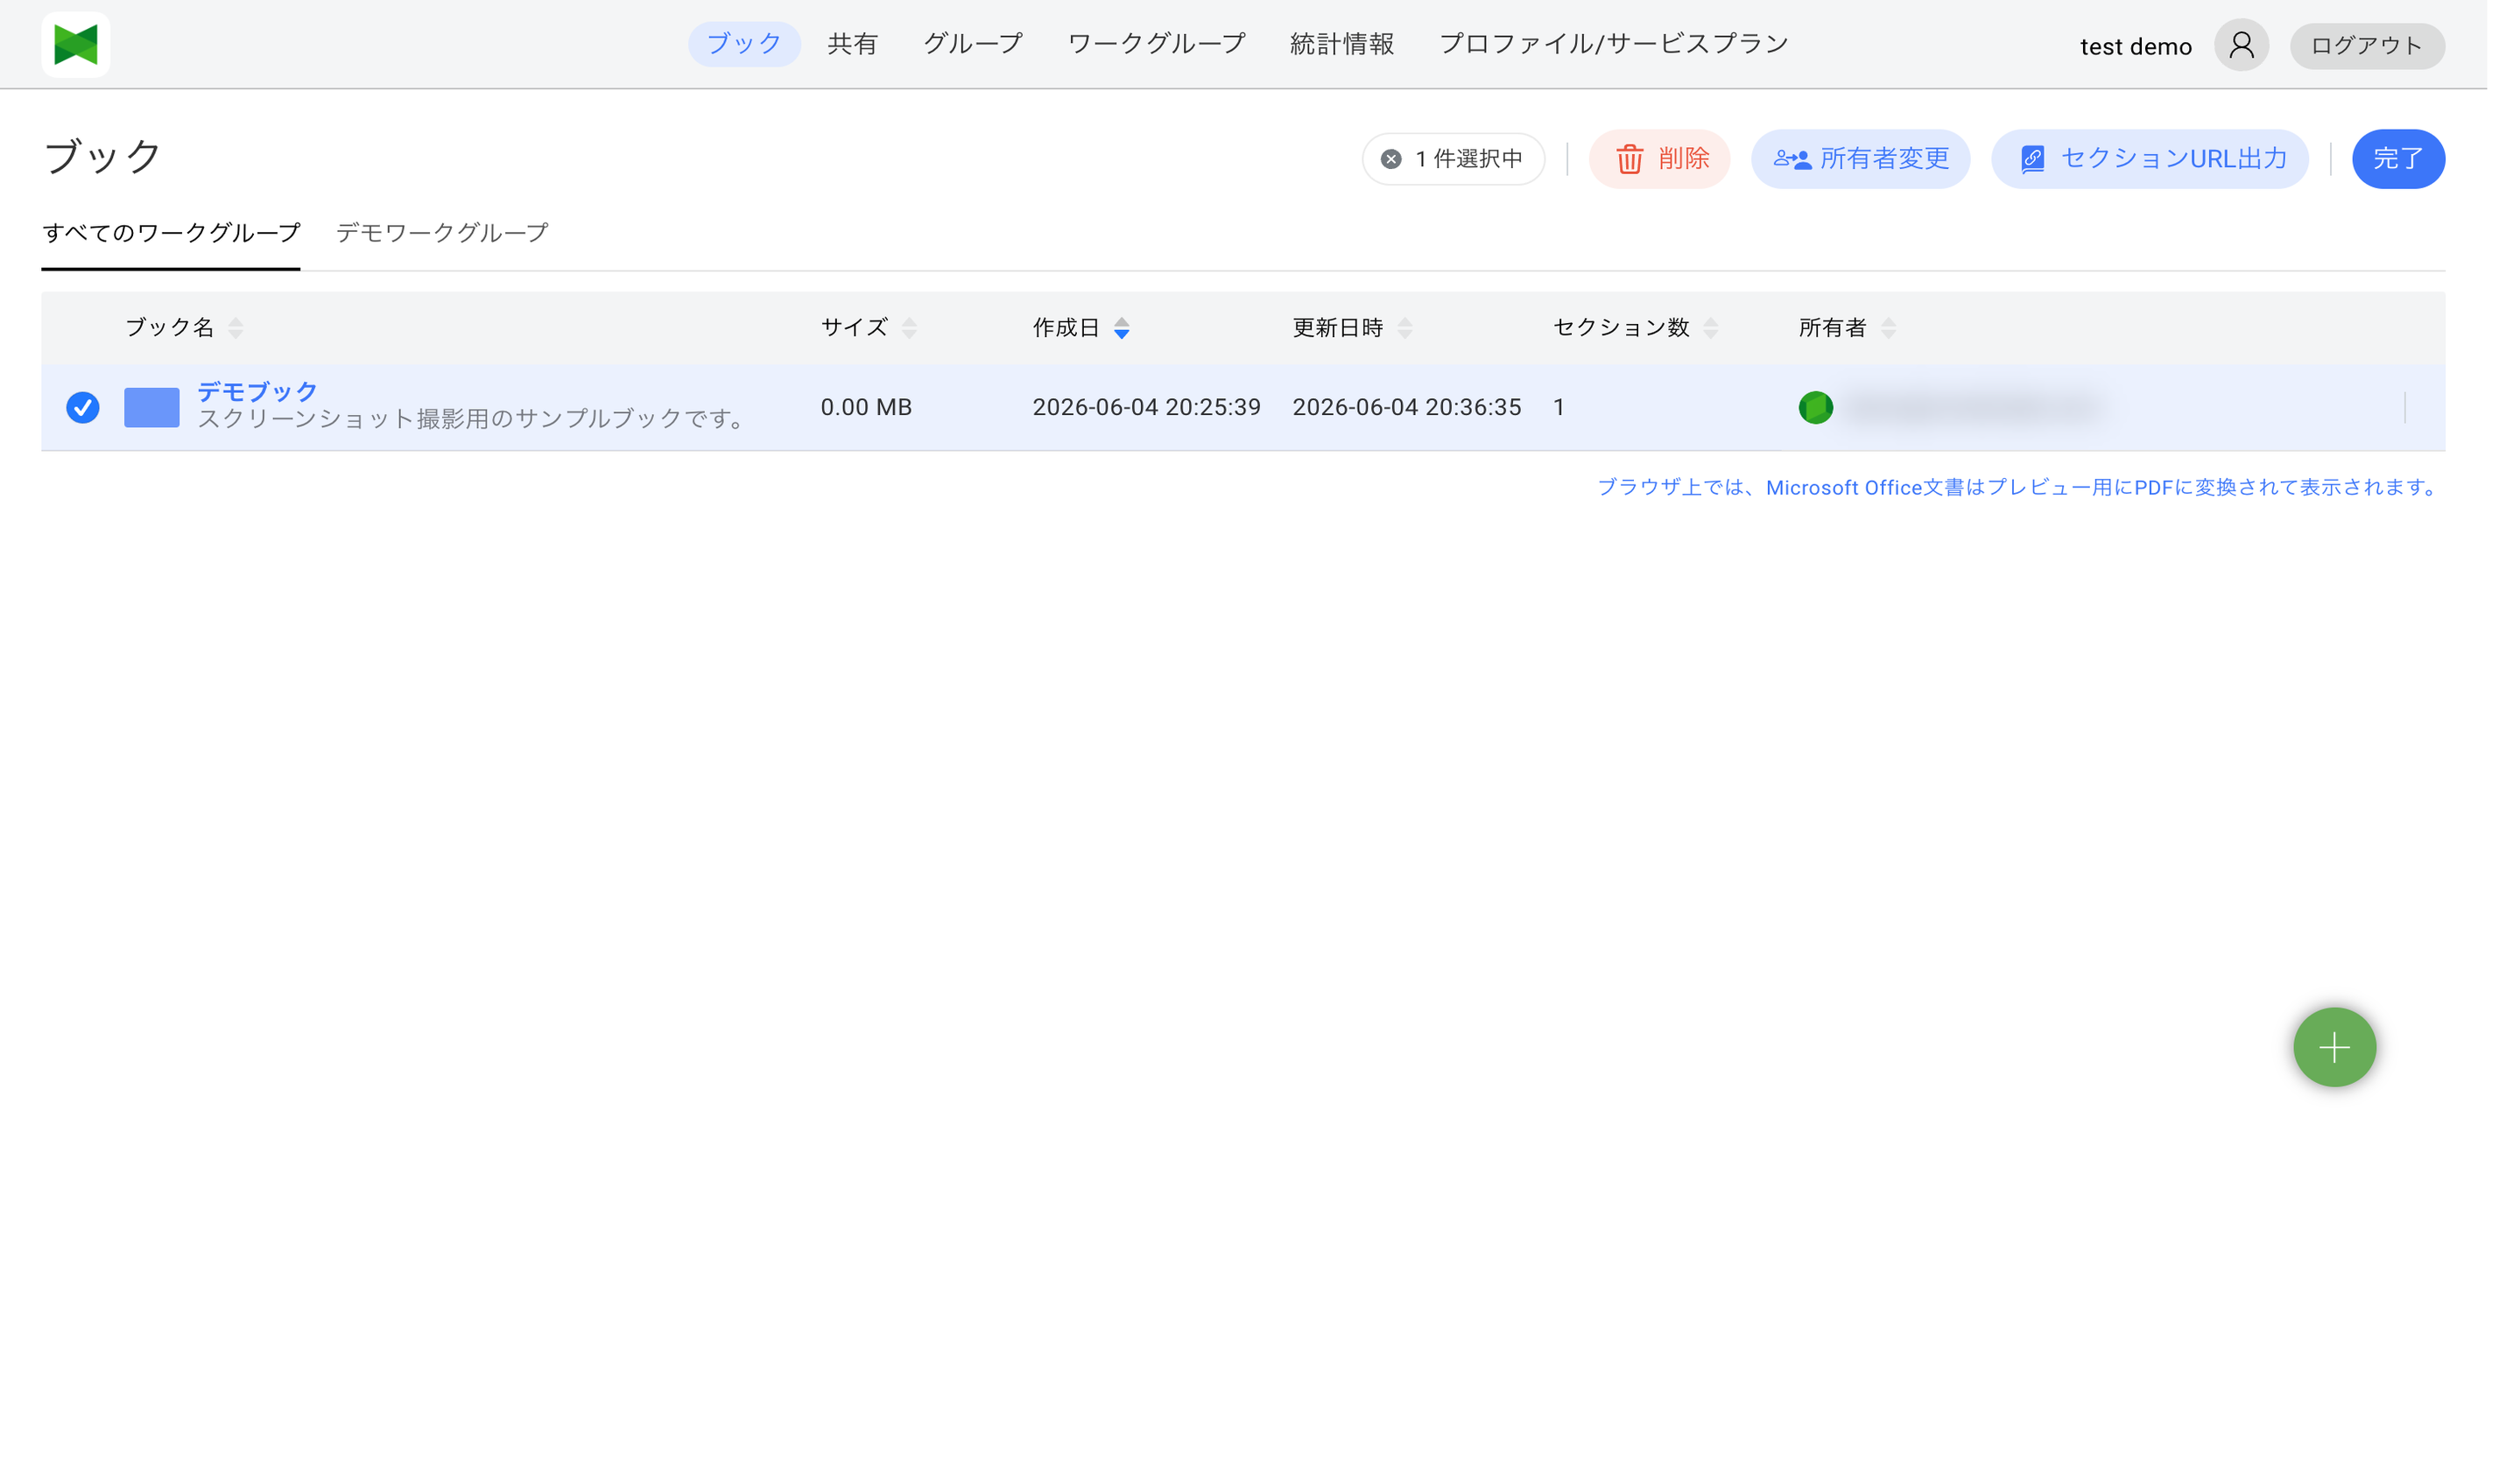
Tip: The per-row Edit / Remove icons for a single book stay in View mode. Use Edit mode only when you want to multi-select for bulk operations.
3.1.2 "Books to display" filter
Use the Books to display select in the toolbar to filter the book list by sharing status.
| Option | Books shown |
|---|---|
| All books (default) | All books you own or that have been shared with you |
| Shared books only | Books that have at least one user share, group share, or access code share configured |
| Unshared books only | Books that have not been shared with anyone yet |
Tip: Use Unshared books only to find books you may have forgotten to share, or Shared books only to clean up existing sharing configuration.
3.2 Selecting a Workgroup
You can switch the displayed workgroup from the tab bar at the top of the book list.
- Click the workgroup you want to display in the tab bar
- Only books belonging to the selected workgroup are shown in the list
Tab order
The tabs are displayed in the following order:
- All workgroups (pinned at the leftmost position)
- Workgroups you own
- Workgroups you have joined
The original order is preserved within each group.
Horizontal scrolling for many tabs
When there are too many workgroups to fit, the tab bar scrolls horizontally.
<</>>buttons appear at the left and right edges to scroll the tabs- You can also scroll using the mouse wheel or touch panning
- The currently selected tab is automatically scrolled into view
Note: The tab bar lists every workgroup you have joined, not only the ones you own or manage. You can browse books belonging to workgroups you joined even as a Reader (per-book edit rights are still enforced by the individual sharing settings).
Note: Which books appear in a workgroup's book list — A workgroup's book list shows books that are shared with the workgroup as a whole (access-code sharing, group sharing, or user shares from an owner / admin / editor). Books that reach members only through direct member-to-member user sharing inside the workgroup are not included in the workgroup book list. In that case, the recipient member can still access the book as an individual share (statistics APIs continue to count all sharing paths as before).
3.3 Creating a Book
To create a new book:
- Click the Add button (
 ) on the book list screen
 - The Create Book dialog appears
- Enter the following information:
| Item | Required | Description |
|---|---|---|
| Book Name | ○ | Name of the book (max 100 characters) |
| Description | - | Description of the book |
| Cover Image | - | Cover image for the book |
| Color | - | Theme color for the book |
- Click the Create button
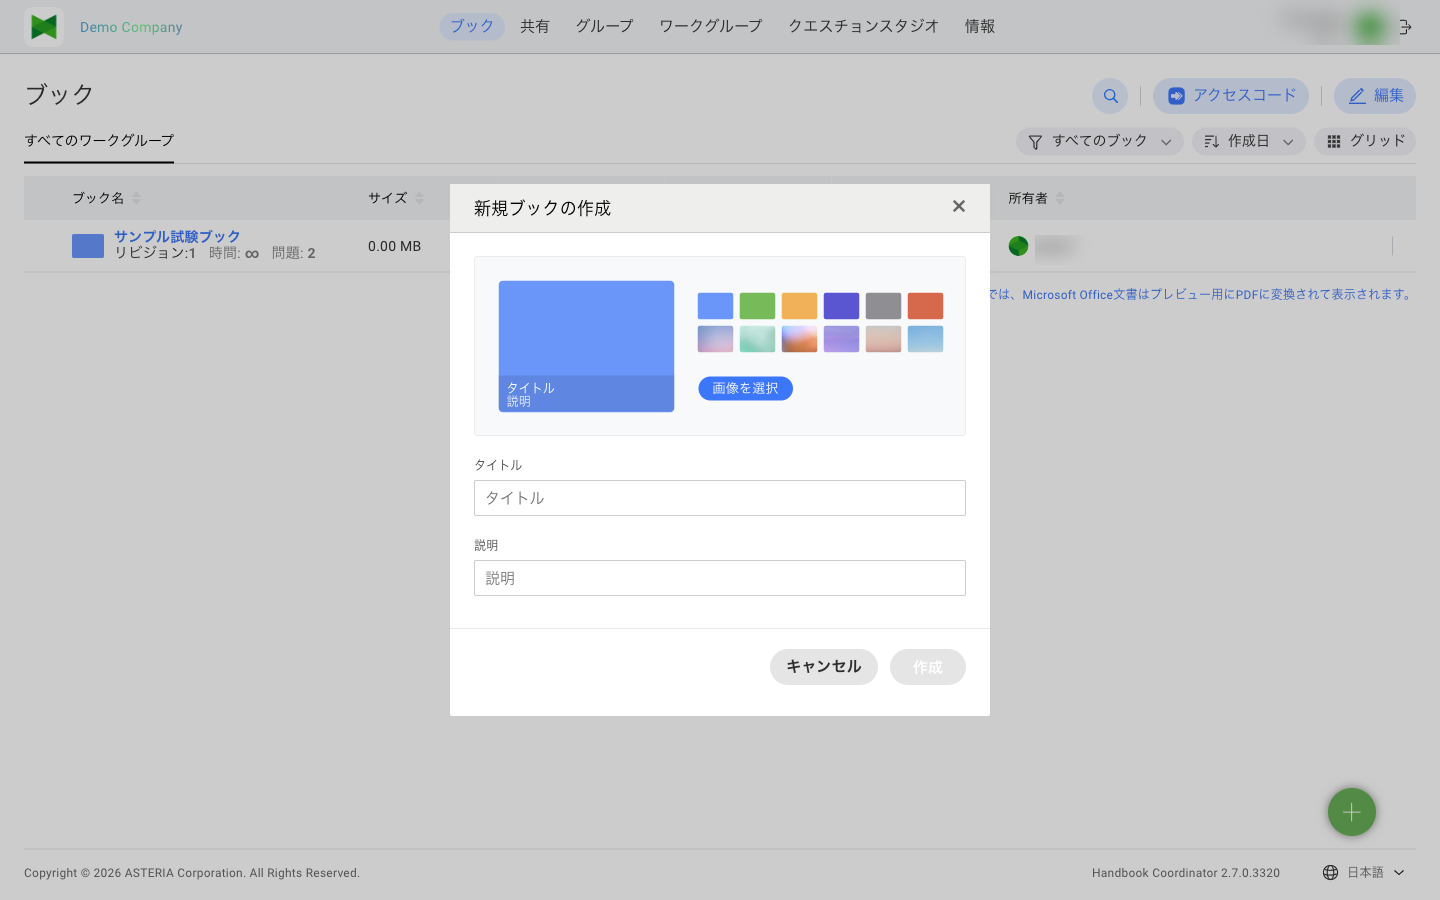
Tip: Setting a cover image makes it easier to identify books in the app.
Book Creation Limits
The number of books you can create varies by plan.
| Plan | Max Books |
|---|---|
| Free | 3 |
| Personal | 10 |
| Team | 30 |
| Business | Unlimited |
| Enterprise | Unlimited |
Note: Once you reach the limit, the message "too many books" will be displayed and you won't be able to create new books. Please consider upgrading your plan.
Section Limits
There is a limit on the number of sections that can be added to a single book.
- Max sections per book: 200 (same for all plans)
Shared Book Reception Limits
The number of books you can receive shares for also varies by plan.
| Plan | Max Shared Books |
|---|---|
| Free | 1 |
| Personal | 3 |
| Team | 30 |
| Business | Unlimited |
| Enterprise | Unlimited |
3.4 Editing a Book
To edit an existing book:
- Hover your mouse over the row of the book you want to edit in the book list
- Click the Edit button (
 ) that appears on the right side of the row
 - The Edit Book dialog appears
- Modify the information
- Click the Save button
Editable Items
- Book Name
- Description
- Cover Image
- Color
Note: Only the book owner or users with write permission can edit a book. The edit button only appears when hovering over a book row you have edit permission for.
3.5 Removing a Book
Removing a Single Book
- Hover your mouse over the row of the book you want to remove in the book list
- Click the Remove button (
 ) that appears on the right side of the row
 - A confirmation dialog appears
- Click the Remove button
Removing Multiple Books at Once
- Click the Edit button at the top right to enter Edit mode (see 3.1.1 View Mode and Edit Mode)
- Select the checkboxes of the books you want to remove
- Click the Remove button () at the top of the screen
- A confirmation dialog appears
- Click the Remove button
- When finished, click Done to return to View mode
Note: Removing a book also removes all sections within the book. This action cannot be undone.
Note: Only the book owner or users with delete permission can remove a book.
3.6 Changing Book Owner
You can transfer book ownership to another user. This feature allows you to transfer books you own to other users.
Steps to Change Owner
- Click the Edit button at the top right to enter Edit mode (see 3.1.1 View Mode and Edit Mode)
- Select the checkbox of the book whose owner you want to change
- Click the Transfer Owner button at the top of the screen
- The "Change Book Owner" dialog appears
Selecting a Workgroup
Select the workgroup from which to choose the new owner using the dropdown at the top of the dialog.
| Workgroup | Description |
|---|---|
| My Workgroup | Your own workgroup (usually not selectable as there are no other members) |
| (Workgroup name) | Workgroups you are participating in |
Note: If you select "My Workgroup", the message "There are no available users in this workgroup" will be displayed because there are no other users besides yourself. To change the owner, select a workgroup that has other members.
Selecting a New Owner
- When you select a workgroup, the member list of that workgroup is displayed
- Enter a username in the Search field to filter the list
- Select the radio button for the user who will become the new owner
- Click the Assign button
When the change is complete, the message "Change owner successfully" is displayed.
Users Who Can Be Selected as New Owner
Users who can be selected as the new owner must meet both of the following conditions:
- Users who have been shared the book
-
Users who have been set up with user sharing or group sharing for that book
-
Users with Editor or higher sharing privilege within the workgroup
- Owner
- Admin (Manage sharing privilege)
- Editor (With sharing privilege)
Note: Users with "Reader" (No sharing privilege) cannot be selected as the new owner, even if they have been shared the book.
For details on sharing privileges, see Appendix D. About Sharing Privileges.
Restrictions
- You can only change the owner of books you own
- After transferring ownership, the original owner loses administrative privileges for the book
3.7 Access Code
To view a book that has an access code set, you need to register the access code in advance.
Note: This feature is not for setting up access codes on books, but for registering access codes to view shared books. For information on how to share books with access codes, see 4. Share.
Registering an Access Code
- Click the Access Code button in the toolbar
- The Access Code dialog appears
- Enter the access code in the input field
- Click the Add Access Code button
- The registered access code appears in the list
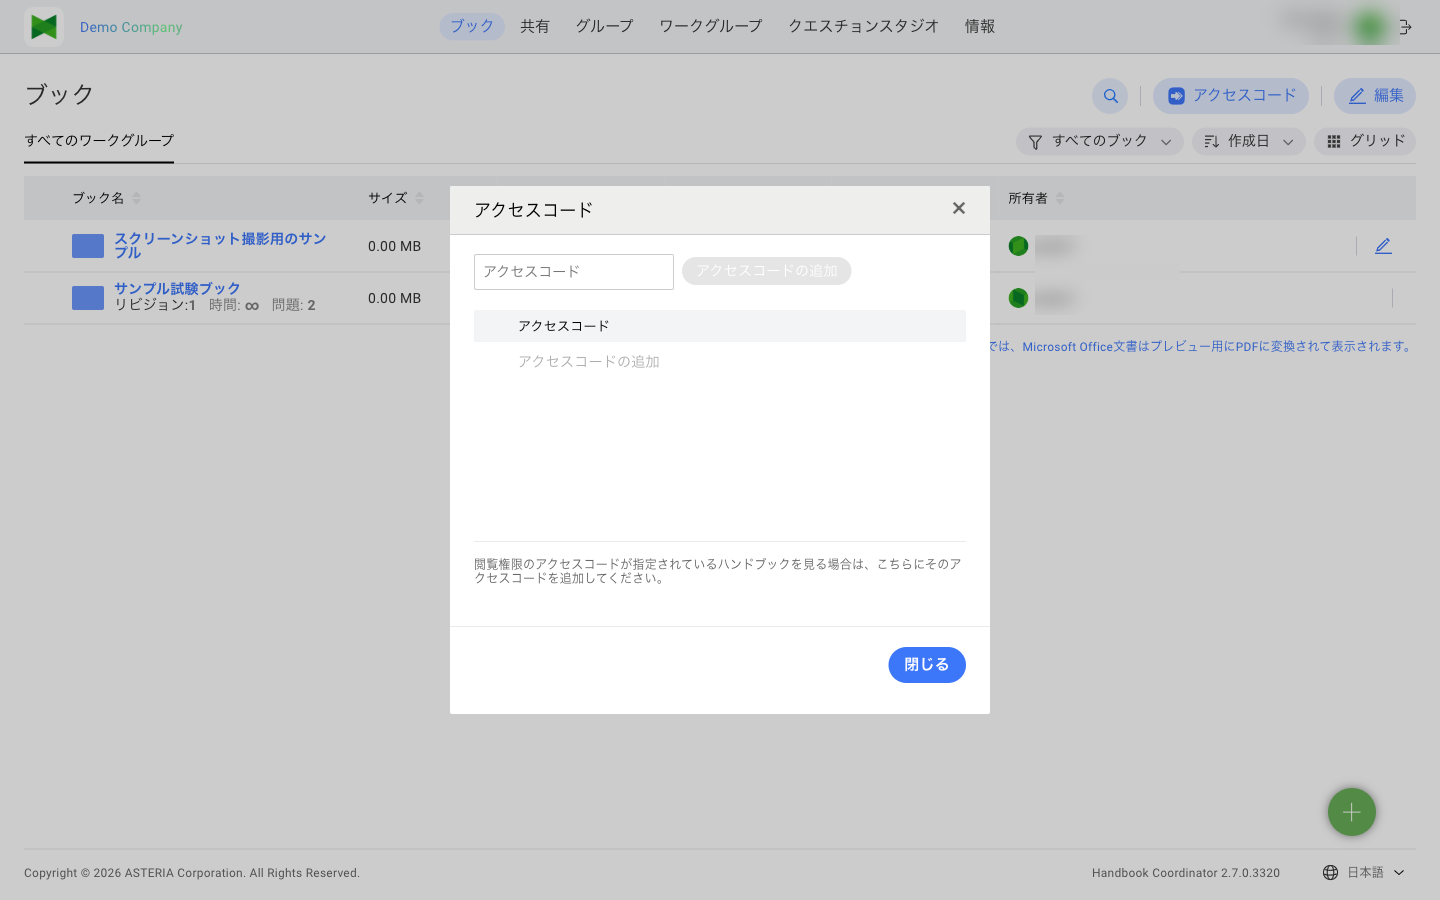
Deleting an Access Code
To delete a registered access code, click the Delete button next to the code you want to remove from the list.
Tip: Access codes are provided by the book's sharing owner. Please contact them if you need an access code.
3.8 Viewing Sections
Click on a book name to navigate to that book's section list screen.
For detailed section operations, see 3.8 Section Management.