
6.6 Member Management
This section explains how to manage workgroup members.
Cloud version vs. dedicated server: The way members are added differs. On the cloud version, you invite members by email and wait for them to accept. On the dedicated server, an administrator adds members directly from the organization's accounts (no acceptance needed). For a full list of the differences, see the at-a-glance table in Chapter 6. Features limited to one environment are marked "(Cloud Version)" or "(Dedicated Server)" in their headings.
Member List
When you select a workgroup, the member list is displayed.
Display Items
| Item | Description |
|---|---|
| Account Name | User's email address |
| Department | The department each user sets on their own profile |
| Last Name | User's last name |
| First Name | User's first name |
| Sharing Privilege | Sharing privilege within the workgroup (Owner/Manage sharing privilege/With sharing privilege/No sharing privilege) |
| State | Member's status (Active/Inviting/Expired, etc.) |
| Platform | Platform last accessed from |
| Enabled Device IDs | Allowed device IDs (shown only on the dedicated server when device ID restriction is enabled) |
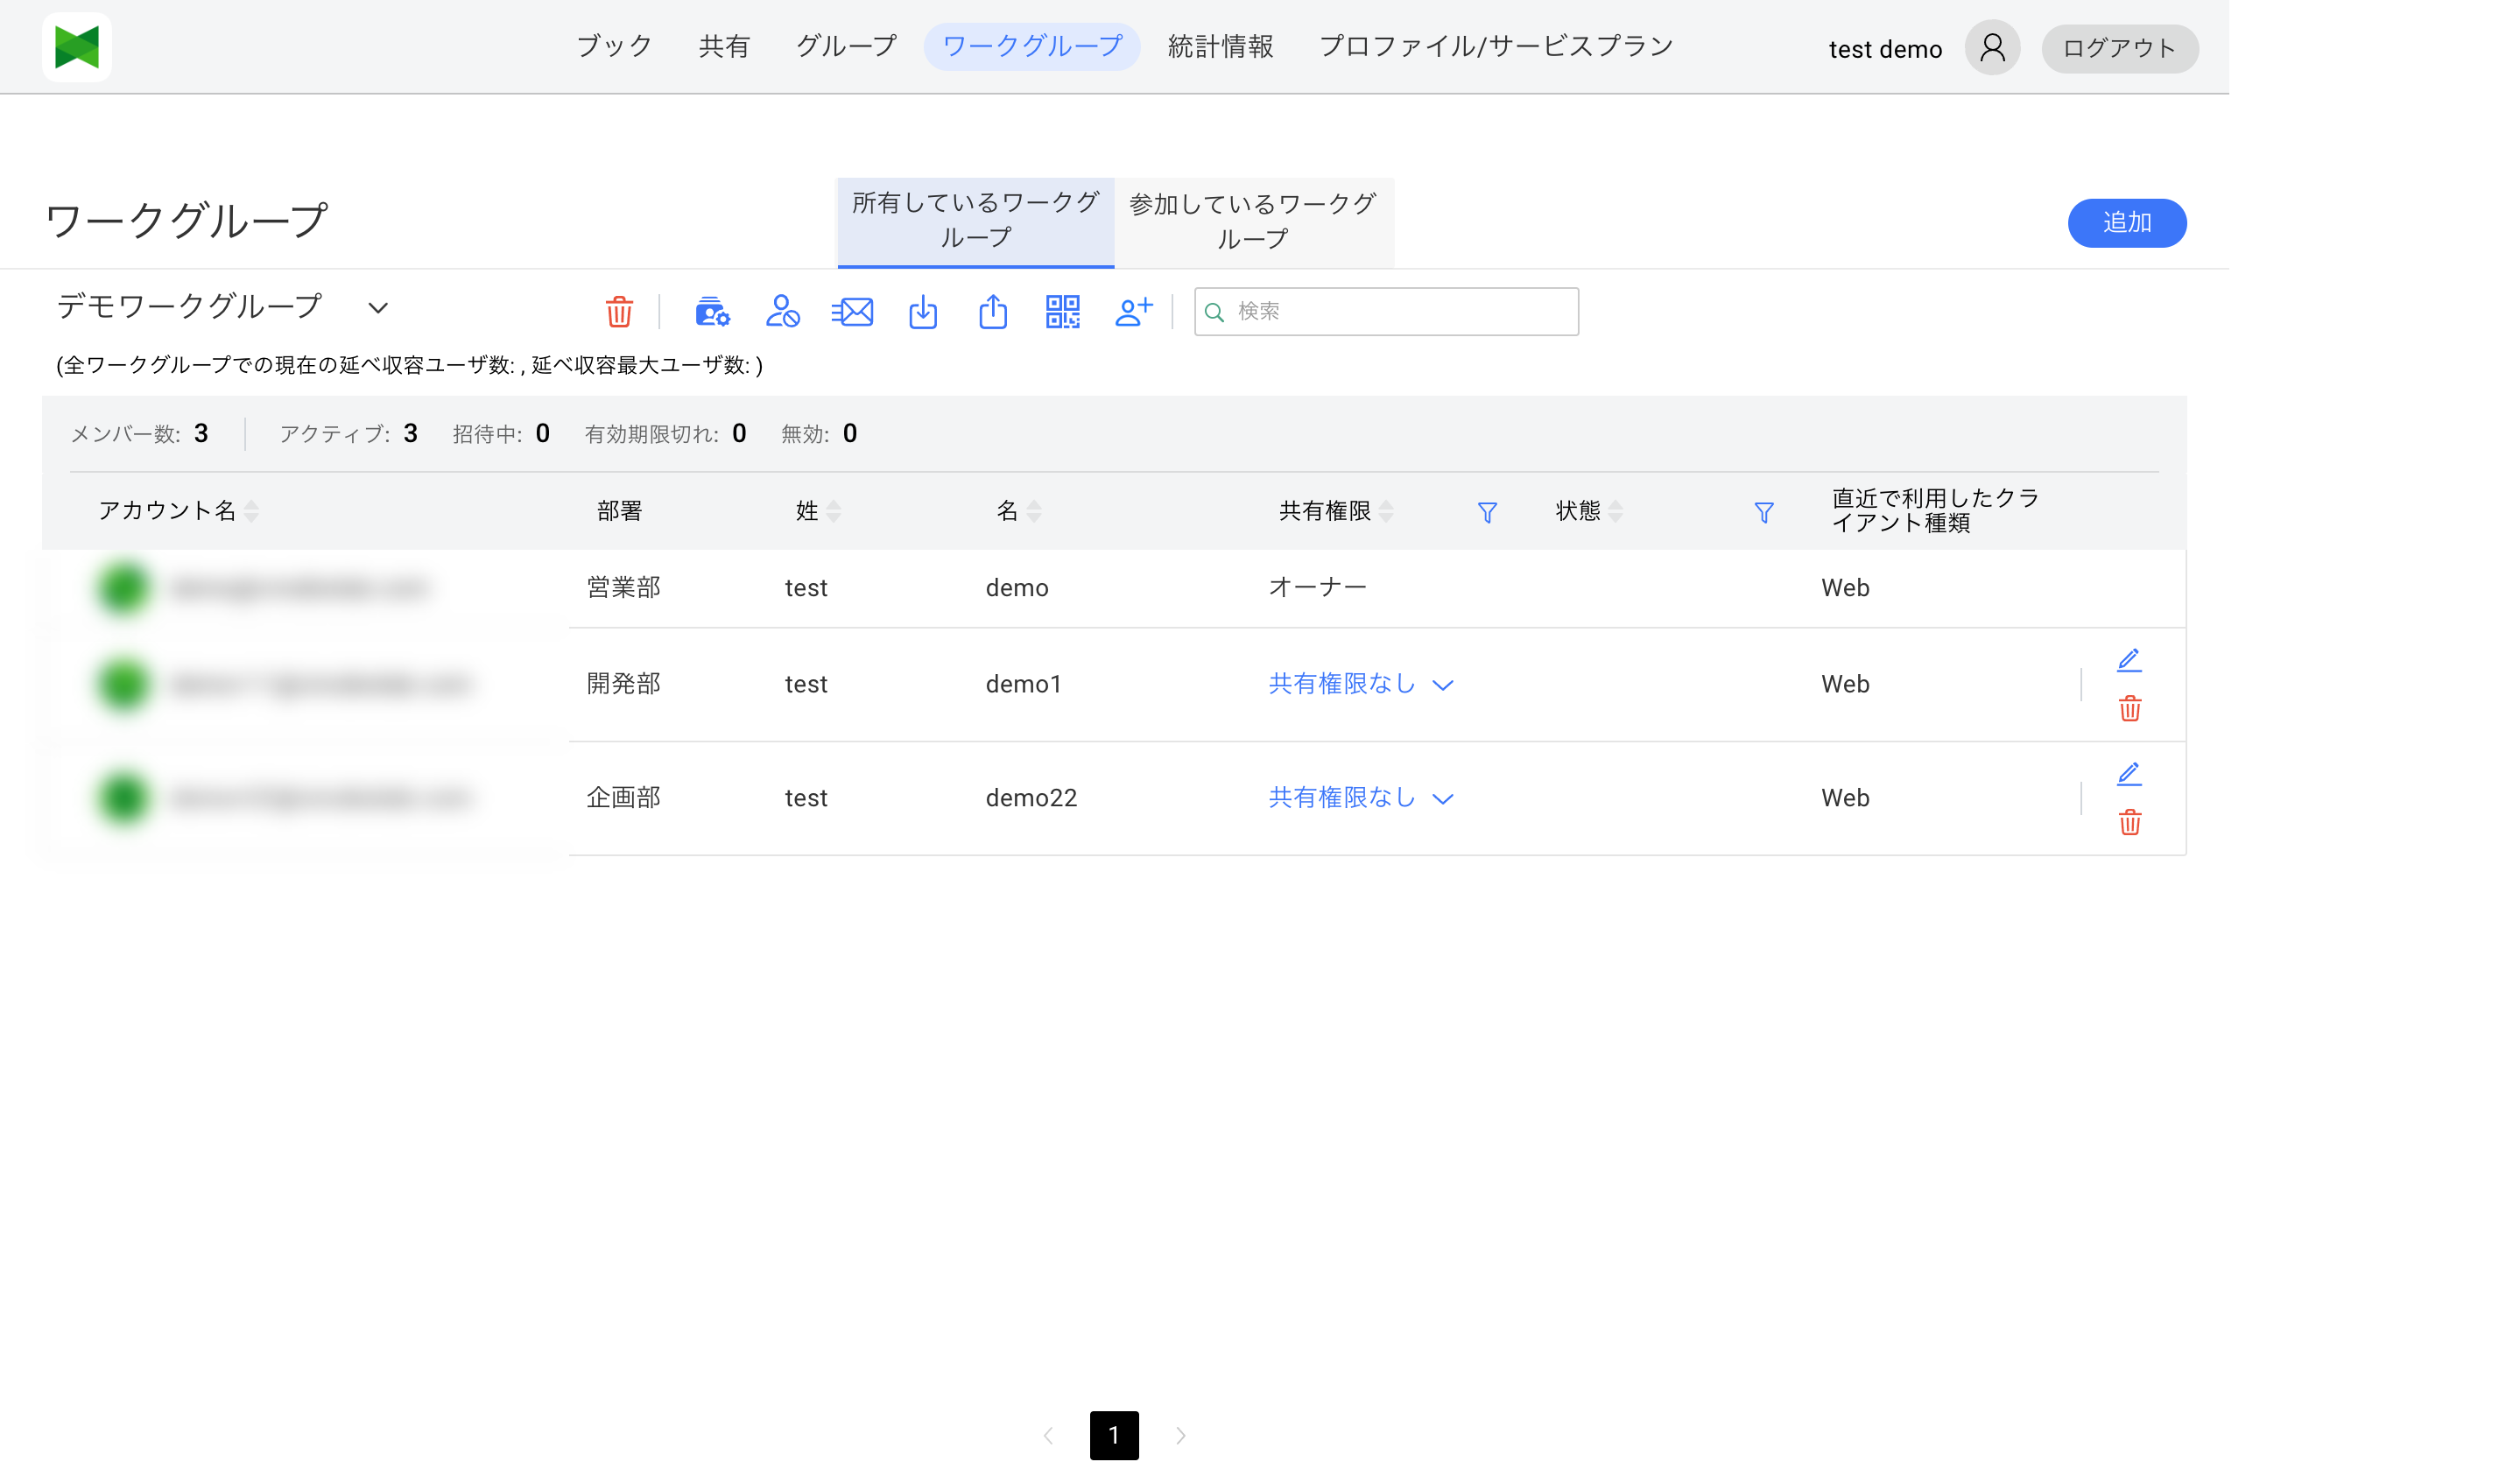
Note: "Department" is a field each user sets on their own profile (see 9.5 Editing the Department). On the cloud server plan it cannot be edited directly from the member management screen. On the dedicated server plan, an admin can edit it from the Accounts tab.
About Sharing Privileges
Sharing privilege indicates the permission level for sharing books within the workgroup.
| Sharing Privilege | Description |
|---|---|
| Owner | Workgroup owner. Has all management and sharing privileges |
| Manage sharing privilege | Can manage book sharing settings. Can add, modify, and remove shares |
| With sharing privilege | Can share books. Cannot manage sharing settings |
| No sharing privilege | Cannot share books. Can only view shared books |
Note: Sharing privilege is different from book creation/editing permission. Users with "No sharing privilege" may still be able to create and edit books.
Difference Between Sharing Privilege and Account Permission (Dedicated Server Version)
In the dedicated server version, there are two distinct permission systems: Sharing Privilege and Account Permission.
| Item | Sharing Privilege | Account Permission |
|---|---|---|
| Configuration Location | Workgroup Member Management | Accounts Tab |
| Scope | Within each workgroup | Entire organization |
| Purpose | Book sharing permission management | System feature access |
| Values | Owner/Manage sharing privilege/With sharing privilege/No sharing privilege | Owner/Admin/Normal/NoEx/Reader |
These are independent concepts, and the same user can have different levels of permissions.
Example: A user with "Editor" account permission can act as "Manage sharing privilege" in a specific workgroup.
For details, see "About Account Permission and Sharing Privilege" in 7. Accounts (Dedicated Server).
Member Status
| Status | Description |
|---|---|
| (Blank) | Active (normally joined) |
| Waiting for confirmation | Invitation email sent, not yet accepted |
| Invitation code has Expired | Invitation has expired |
| Waiting for confirmation | Join request sent, not yet approved |
| Not Invited | Account is disabled |
Checking Member Count
For owned workgroups, a summary of member counts is displayed at the top of the screen:
- Members: Total number of workgroup members
- Active: Number of normally joined members
- Inviting: Number of members with pending invitations
- Expired: Number of members with expired invitations
- Disabled: Number of disabled members
Checking User Capacity
Below the workgroup name, the organization's overall user capacity status is displayed:
- Current total accommodated users across all workgroups: The total number of users across all workgroups (if the same user belongs to multiple workgroups, they are counted for each)
- Maximum total accommodated users: The upper limit of total users allowed by your subscription plan
Note: This display helps you understand your organization's overall user capacity status. If you're approaching the limit, please consider upgrading your plan.
6.6.1 Inviting Members
How members are added differs by environment:
- Cloud version: Invite members by email; they join once they accept
- Dedicated server: An administrator adds members directly from the organization's accounts (no acceptance needed)
In addition, you can bulk import members from a CSV file or another workgroup (available on both environments; see Importing Members).
Inviting in Cloud Version
- Click the Invite button
- The Invite dialog appears
- Enter the following information:
| Item | Required | Description |
|---|---|---|
| Email Address | ○ | Email address of the user to invite |
| Sharing Privilege | ○ | Sharing privilege to assign (Manage sharing privilege/With sharing privilege/No sharing privilege) |
- Click the Invite button
- An invitation email is sent
- The member is added to the list with status Waiting for confirmation
The invitee can accept in one of the following ways:
- Option A (Web UI): After logging in, open the "Workgroup" tab → "Joined Workgroups" → the invitation notification bell (🔔) at the top right → Accept → enter the 6-digit invitation code from the invitation email → Send
- Option B (devices with the Handbook X app installed): Opening the join link in the invitation email launches the app, and the invitation code is carried over from the URL automatically. If you are already signed in with the invited account, simply confirming the dialog accepts the invitation; if not, the sign-up/login screen appears with the invitation code pre-filled
Note: Opening the join link in a PC web browser (Web UI) does not automatically accept the invitation. To accept from the Web UI, enter the invitation code following the steps in Option A.
Once accepted, the member's status changes from Waiting for confirmation to Active on the owner's member list.
Note: The invitation code appears only in the invitation email. It cannot be looked up from the owner's member list (only resending the email is possible). For details, see 6.4 Joining a Workgroup.
Bulk Inviting Multiple Members (Cloud Version)
- Click the Send Invitation Email button
- The Bulk Invite dialog appears
- Select users to invite (those with Inviting/Expired status)
- Click the Send button
Adding Members on the Dedicated Server
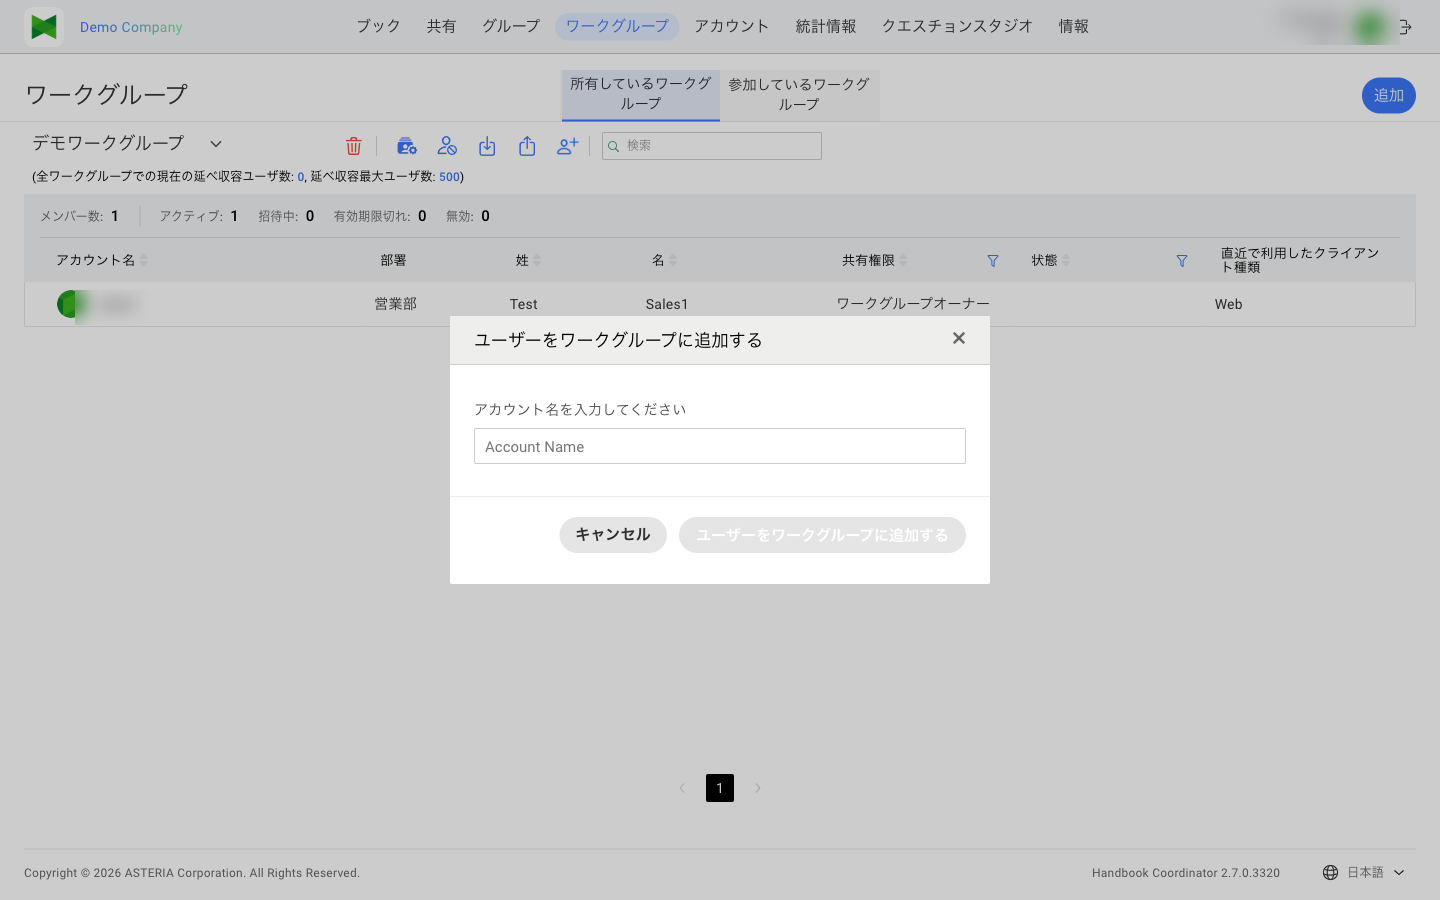
- Click the Add button
- The Add Member dialog appears
- Select the user to add
- Set the sharing privilege
- Click the Add button
Note: Only accounts that already exist in the organization can be added. For creating accounts, see 7. Accounts.
Importing Members
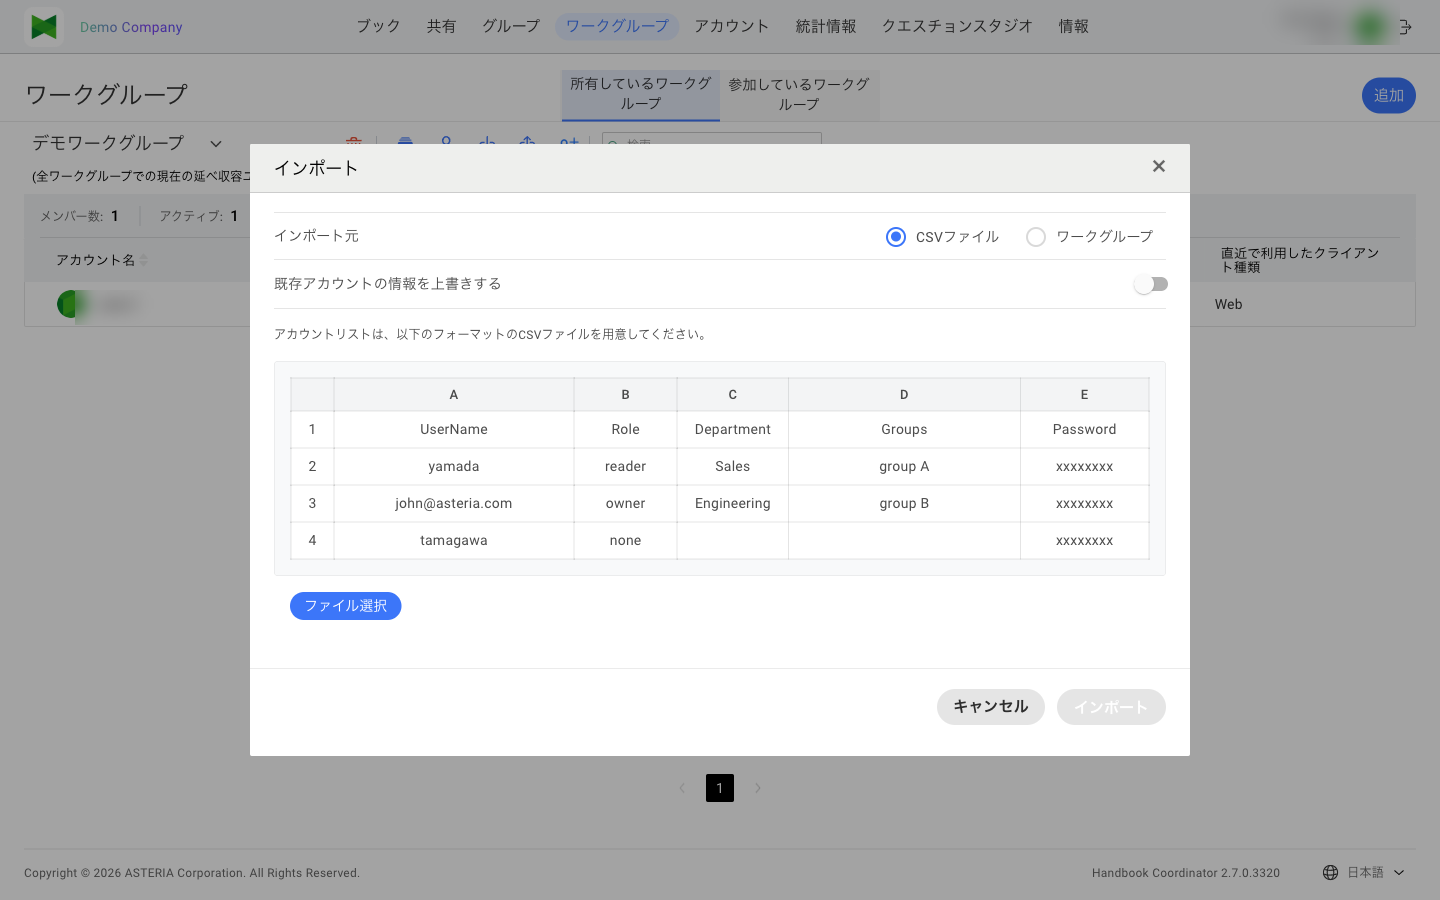
You can import members in bulk from a CSV file or from another workgroup. This feature is available on both the cloud version and the dedicated server.
- Click the Import button (
 ) in the member management toolbar
 - The Import dialog appears
- Choose the Import source:
- CSV file: Import from a local CSV file
- Workgroup: Import members from another workgroup you own
- For a CSV file, optionally turn on the Overwrite existing account information switch (overwrites first name, last name, department, password, and role of existing accounts), then choose the file with Select file
- For a workgroup, select the source workgroup from the list
- Click the Import button
Importing from a Workgroup
Choosing Workgroup as the import source lets you add the active members of another existing workgroup in bulk. No invitation emails or approval steps are required; the imported members become active immediately.
- Workgroups selectable as the source are private workgroups created by the same user as the destination workgroup in which the operating user participates as a sharing privilege administrator or higher
- Imported members are added with the sharing privilege No sharing privilege. Change it afterwards as needed (see 6.6.4 Changing Member Sharing Privileges)
- Members that already exist in the destination workgroup are skipped (the Overwrite existing account information switch applies only to CSV imports)
Note: On the cloud version, importing from a workgroup is available with the Team / Business plans (not available with the Free / Personal plans). On the dedicated server (Enterprise) it is always available.
CSV File Format
The CSV file format differs between the cloud version (7-column format) and the dedicated server (5-column format). For details, see 6.7 Importing and Exporting Users.
6.6.2 Resending and Canceling Invitations (Cloud Version)
Resending Invitations
If an invitation has not been accepted or has expired, you can resend it.
- Click the Resend button for the target user in the member list
- Click Resend in the confirmation dialog
- A new invitation email is sent
Canceling Invitations
To cancel an invitation:
- Click the Cancel Invite button for the target user in the member list
- Click Cancel in the confirmation dialog
- The invitation is canceled
Note: Canceled invitation links become invalid.
6.6.3 Approving and Rejecting Join Requests (Cloud Version)
When you receive a join request for a public workgroup:
Approving Join Requests
- Check users with "Waiting for confirmation" status in the member list
- Click the Approve button
- The user joins the workgroup
Rejecting Join Requests
- Check users with "Waiting for confirmation" status in the member list
- Click the Reject button
- The join request is rejected
6.6.4 Changing Member Sharing Privileges
To change a member's sharing privilege:
- Select the workgroup to display the list of members
- In the Sharing Privilege column of the target user, the current sharing privilege is always shown with a ▼ icon. Click it
- Select a new sharing privilege from the choices displayed:
- Manage sharing privilege: Can manage book sharing settings
- With sharing privilege: Can share books
- No sharing privilege: Cannot share books
- The sharing privilege is changed
Note: The owner's sharing privilege cannot be changed.
Operations by Sharing Privilege
| Operation | Owner | Manage sharing privilege | With sharing privilege | No sharing privilege |
|---|---|---|---|---|
| View books | ○ | ○ | ○ | ○ |
| Create/edit books | ○ | ○ | ○ | - |
| Remove books | ○ | ○ | △* | - |
| Manage sharing settings | ○ | ○ | - | - |
| Group management | ○ | ○ | - | - |
| Invite members | ○ | ○ | - | - |
| Change sharing privileges | ○ | ○ | - | - |
| Workgroup settings | ○ | - | - | - |
| Delete workgroup | ○ | - | - | - |
*△: Only books they created
6.6.5 Removing Members
To remove a member from the workgroup:
- Click the Remove button (
 ) for the target user in the member list
 - A confirmation dialog appears
- Click the Remove button
Note: Removing a member prevents them from accessing the workgroup.
Note: The owner cannot be removed.
Impact of Removal
- Books created by the user remain (owner is not changed)
- Individual shares to the user are revoked
- If the user belonged to groups, they are removed from those groups
6.6.6 Change Account Status
You can bulk change member account status.
- Click the Change Account Status button
- The Change Account Status dialog appears
- Select target members
- Select a new status:
- Enable: Enable the account
- Disable: Disable the account
- Click the Change button
Disabled Members
- Cannot access the workgroup
- Cannot view books
- Invitation emails are not sent
Searching and Filtering Members
Searching Members
Enter keywords in the search box to search for members.
Search targets: - Account Name (email address) - Last Name - First Name
Filtering by Sharing Privilege
- Click the filter icon in the Sharing Privilege column
- Select sharing privileges to display
- Only members with selected sharing privileges are shown
Filtering by Status
- Click the filter icon in the State column
- Select statuses to display
- Only members with selected statuses are shown
Editing Members (Dedicated Server Version)
In the dedicated server version, you can edit detailed member information.
- Click the Edit button (
 ) for the target user in the member list
 - The Edit Member dialog appears
- Modify the information:
- Last Name/First Name
- Department
- Sharing Privilege
- Click the Save button
Note: The department changed here is kept in sync with the user's profile and the department on the Accounts tab.