
9. Profile / System Information
This tab allows you to view and edit account information, manage service plans, and check billing information.
Note: The tab is labeled "System Information" on the dedicated server plan and "Profile / Service Plan" on the cloud server plan.
9.1 Profile Information
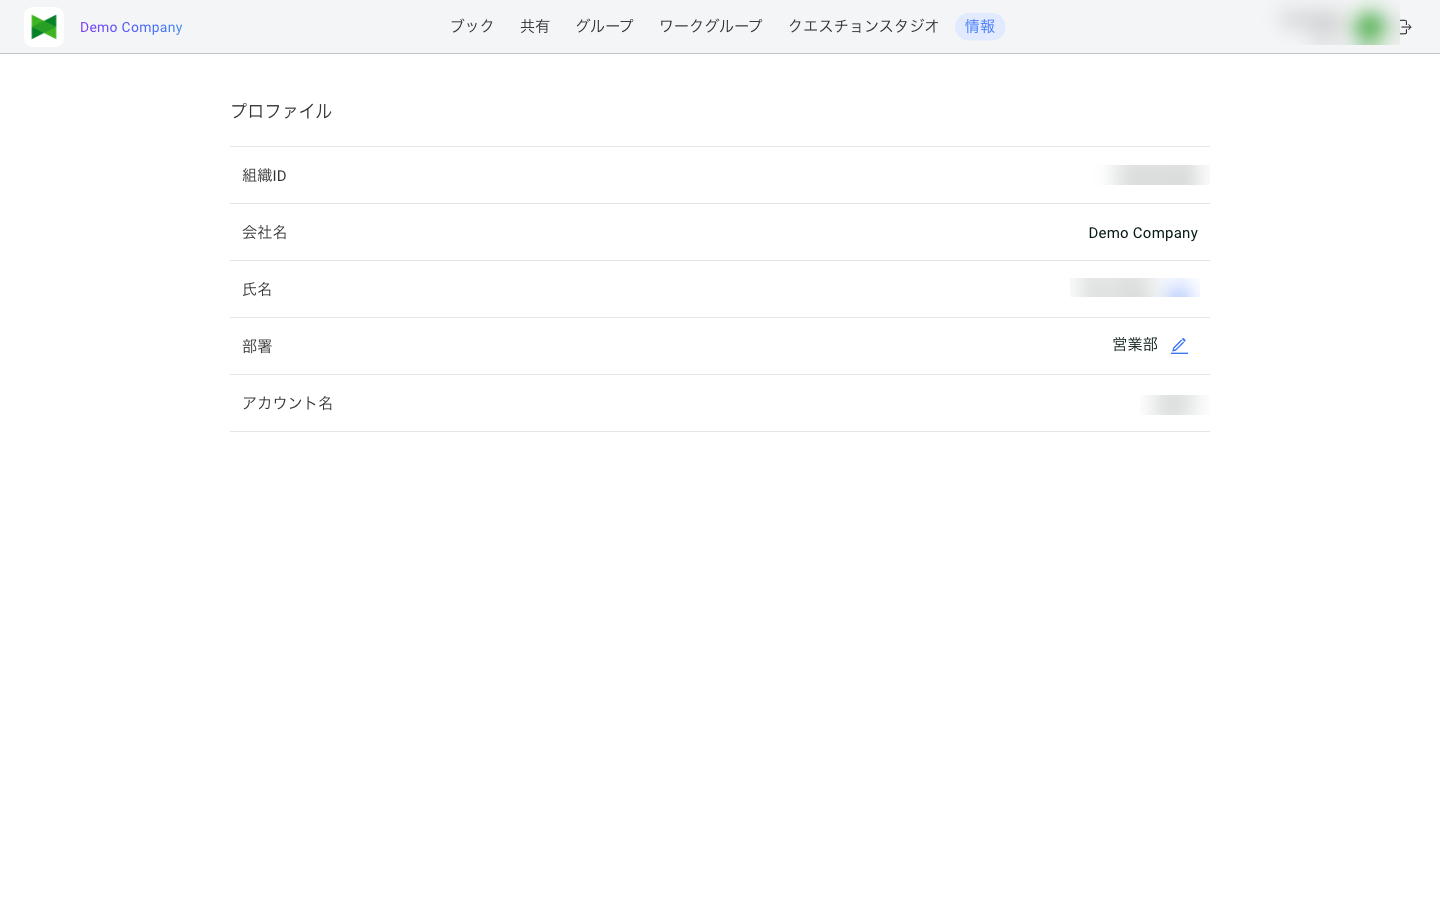
Profile information is displayed at the top of the screen.
Display Items
| Item | Description |
|---|---|
| Organization ID | Unique identifier for the organization |
| Company Name | Registered company name |
| Name | User's full name |
| Department | User's department (optional, available on both cloud and dedicated server plans) |
| Account Name | Email address used for login (cloud server plan) / account name (dedicated server plan) |
| Company Logo | Preview of the organization's company logo image (dedicated server plan only; shows "Not set" when unset — see 9.6) |
| Wallpaper | Preview of the wallpaper image for the client apps (dedicated server plan only; shows "Not set" when unset — see 9.6) |
9.2 Admin Settings (dedicated server, contract owner)
Note: This section is only displayed on the dedicated server plan, for users with the contract owner role. It is not shown on the cloud server plan.
On the dedicated server, the contract owner can optionally grant admins (and the contract owner themselves) cross-book access to every book in the organization. This setting applies only to Web UI sessions, and does not affect iOS / Mac / Windows / Android client connections.
Opening the Admin Settings dialog
- Click the Admin Settings button shown below the profile information (right-aligned) on the "System Information" tab
- The Admin Settings dialog opens
Options
| Option | Description |
|---|---|
| Allow viewing all books (Web UI only) | When ON, admins and the contract owner can view every book in the organization from the Web UI, including books they do not own or participate in |
| Allow editing all books (Web UI only) | When ON, the above users can also edit those books. Turning this ON automatically enables "Allow viewing" |
Defaults
- New organizations: "Allow viewing all books" defaults to ON (editing is OFF)
- Existing organizations: When the server is updated to a version that includes this feature, "Allow viewing all books" is automatically set to ON at that time (an automatic carry-over of existing settings to the new version, commonly called a "migration"). If you prefer to limit admin access, the contract owner should review and adjust this setting promptly
Important notes
- This setting only affects Web UI sessions. It does not apply to admins or owners connecting from iOS / Mac / Windows / Android clients. On those clients, only the conventional workgroup / share-based permissions remain in effect
- When a user without write permission calls an edit API, the Web UI displays a localized error message
9.3 Editing Company Name
To change the company name:
- Click the Edit button (
 ) next to the company name
 - The Edit Company dialog appears
- Enter a new company name
- Click the Save button
Note: Editing company name is only available to users with owner privileges (except in dedicated server version).
9.4 Editing Name
To change your name:
- Click the Edit button () next to the "Name" field
- The Edit Name dialog appears
- Enter last name and first name
- Click the Save button
9.5 Editing the Department
To change your department:
- Click the Edit button () next to the department
- The Edit Department dialog appears
- Enter a department name (e.g. Sales, Engineering, Planning)
- Click the Save button
Department is optional and may be left empty. The value you set is also reflected on:
- The workgroup member list (see 6.6 Member Management)
- The user picker in the Create/Edit Group dialogs (see 5. Groups)
- The account list (dedicated server plan, see 7. Accounts)
- User import/export CSVs (the
Departmentcolumn)
Note: On the dedicated server plan, admins can also edit other users' departments directly from the Accounts tab. The value stays in sync with the department set from the profile.
9.6 Company Logo and Wallpaper Settings (dedicated server plan)
Note: This section is only displayed on the dedicated server plan. The previews are visible to all users, but only the contract owner can set or delete the images.
On the dedicated server, the contract owner can configure the organization's company logo and a wallpaper for the client apps. The configured images are shown as previews on the "Company Logo" and "Wallpaper" rows of the profile information on the "System Information" tab (or "Not set" when no image is configured).
| Item | Description |
|---|---|
| Company Logo | When set, the Handbook X logo at the top left of the admin console header is replaced with the uploaded image in real time. Deleting it restores the default logo |
| Wallpaper | An image displayed as the wallpaper in the client apps |
Note: For the wallpaper, the current release provides the server-side setting only. A future client app update will enable the configured wallpaper to be displayed on the clients.
Setting the company logo / wallpaper
- Click the Edit button () next to "Company Logo" (or "Wallpaper")
- The Edit Company Logo (or Edit Wallpaper) dialog appears
- Click the Select Image button and choose an image file
- Check the preview and click the Save button
Tip: The supported image formats are PNG and JPEG (JPEG is recommended). The maximum size is 5MB; files in other formats or exceeding the size limit cannot be used.
Deleting the company logo / wallpaper
- Click the Edit button () next to "Company Logo" (or "Wallpaper")
- Click the Delete Image button at the bottom left of the dialog
- Click Delete Image in the confirmation dialog
9.7 Current Service Plan
Note: This section is only displayed in the cloud version.
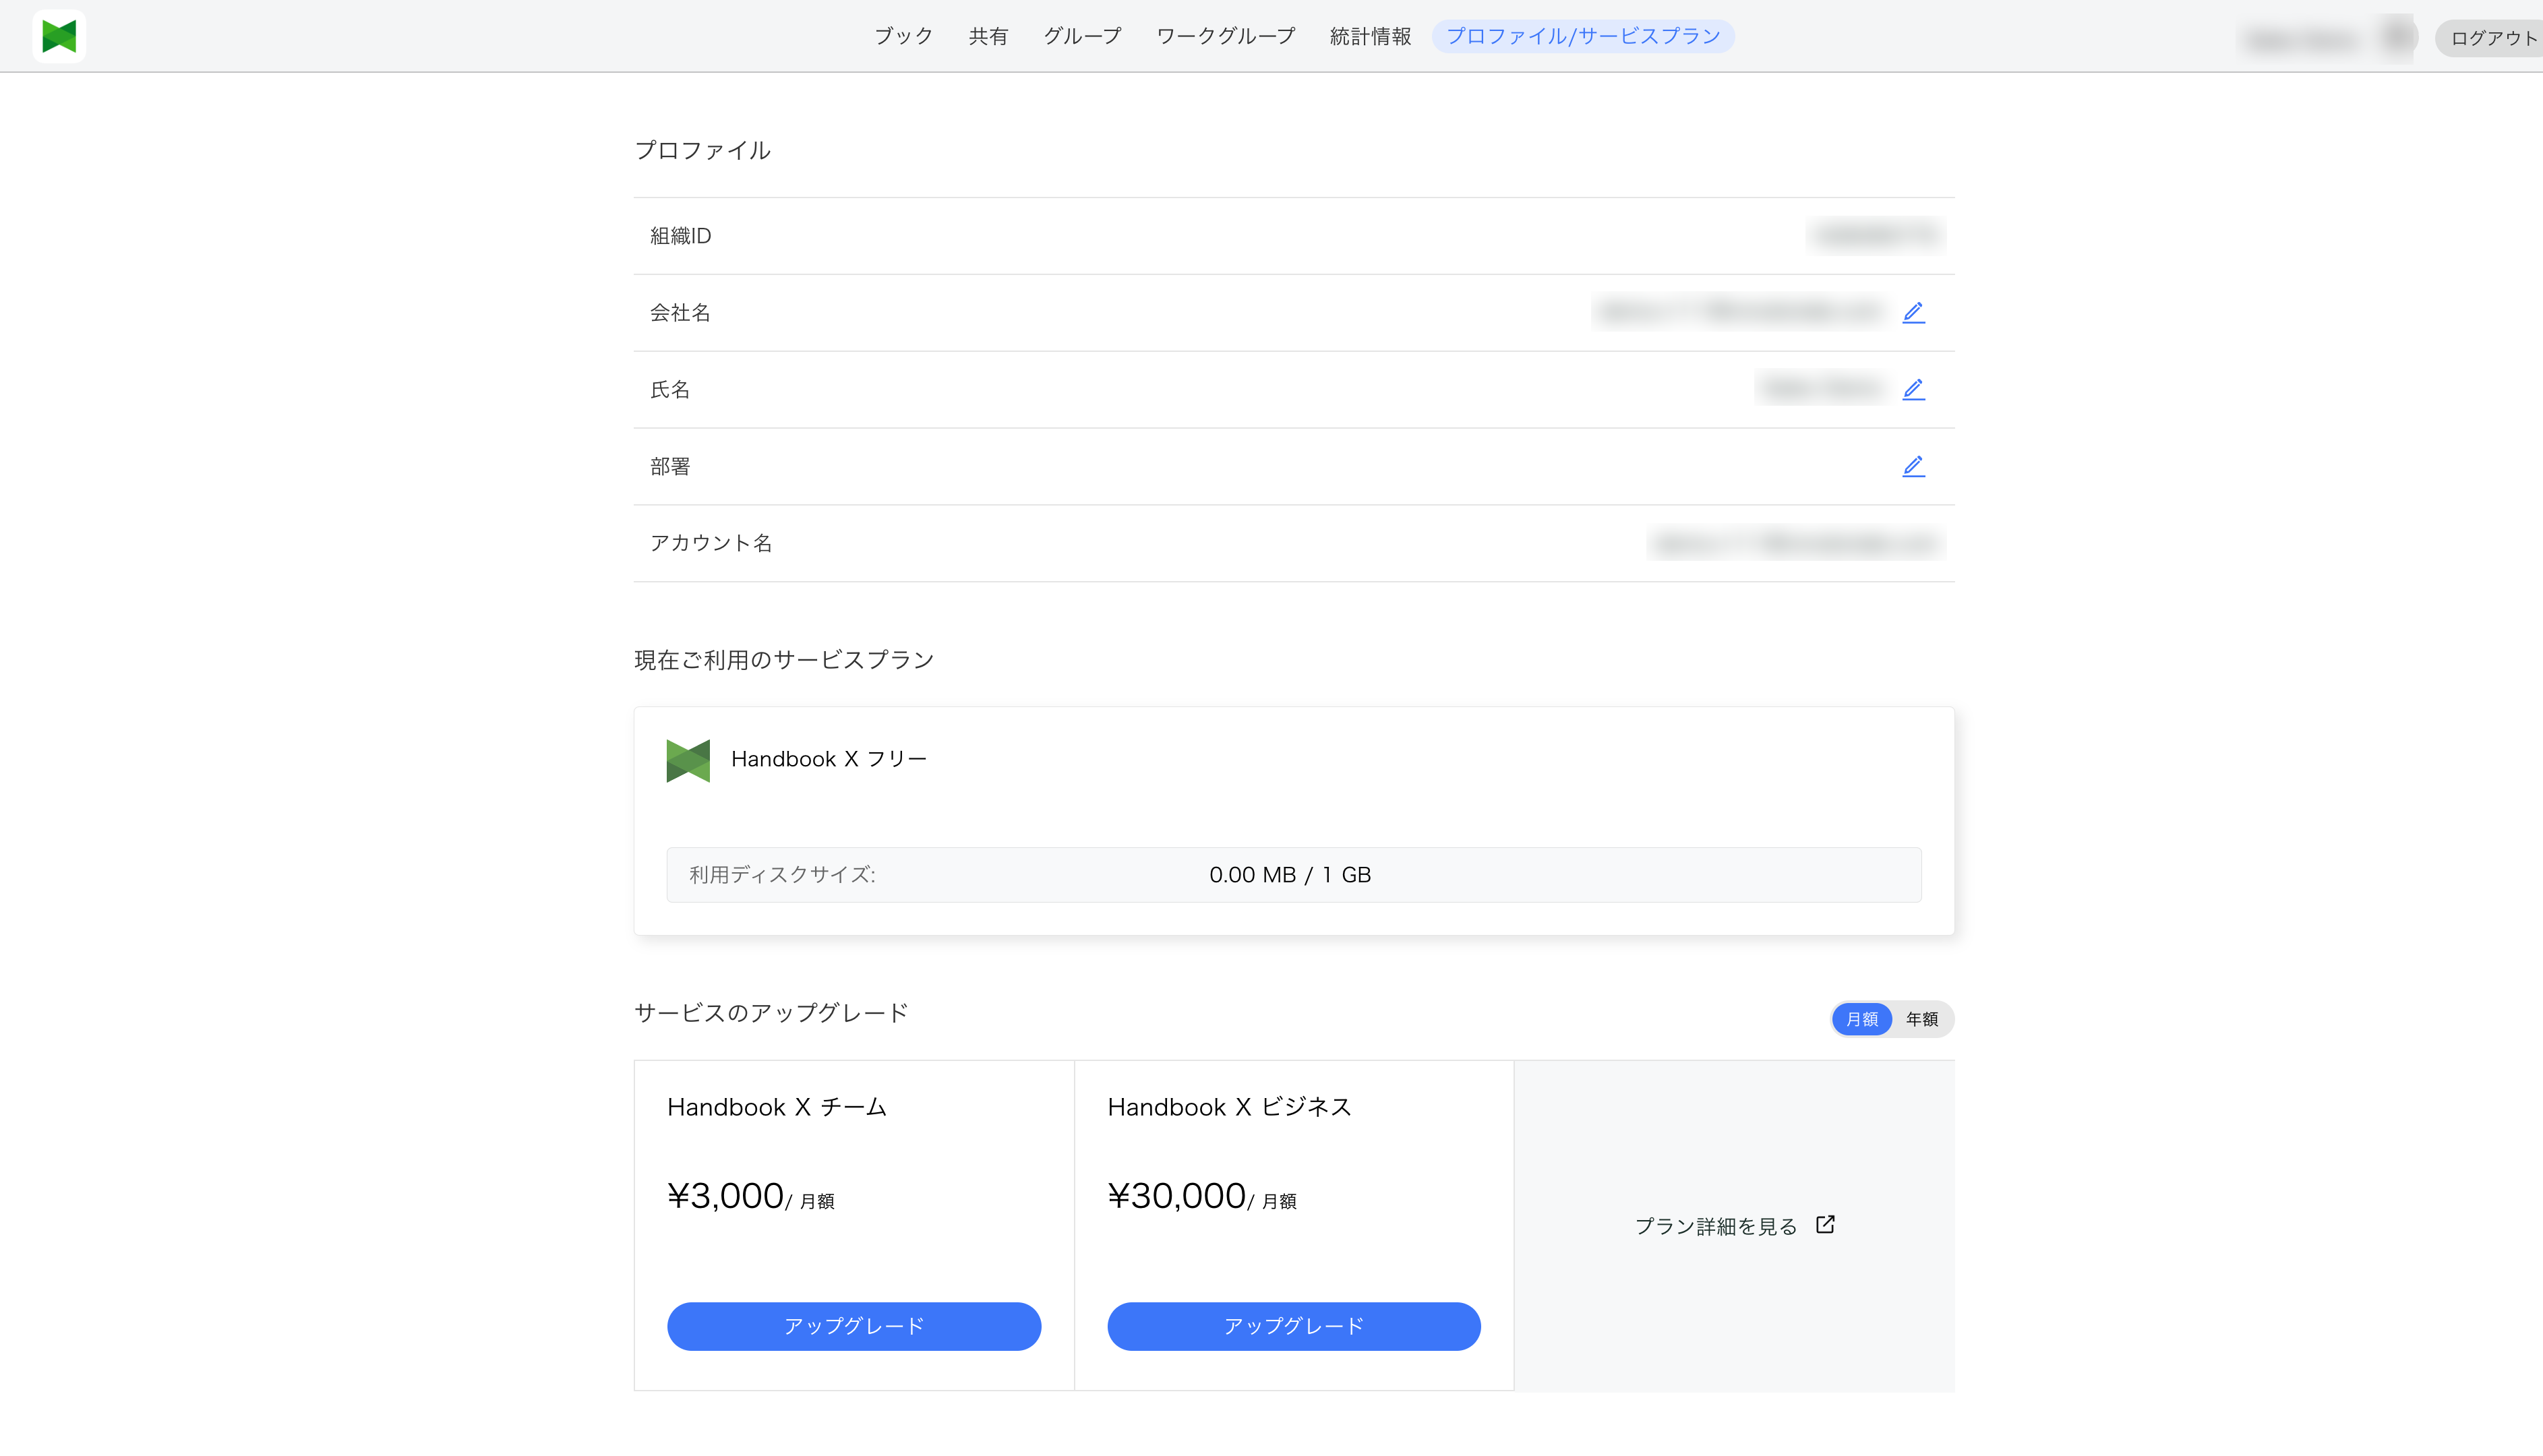
Information about your current service plan is displayed.
Display Items
| Item | Description |
|---|---|
| Plan Name | Current plan (Free/Team/Business/Enterprise, etc.) |
| Billing Cycle | Monthly/Yearly |
| Used Disksize | Used capacity / Maximum capacity |
| Number of Users | Used user count / Maximum user count |
| Status | Contract status (Active/Canceled, etc.) |
| Contract Period | Current contract period |
| Next Billing Date | Next scheduled billing date |
| Auto-Renew | Auto-renewal enabled/disabled (Paid plans only) |
9.8 Adding and Reducing Disk Space
Note: This feature is only available in paid plans of the cloud version.
Adding Disk Space
- Click the Add Space button
- The Add Space dialog appears
- Select the amount of space to add
- Review the pricing
- Click the Purchase button
Reducing Disk Space
- Click the Reduce Space button
- The Reduce Space dialog appears
- Select the reduced capacity
- Click the Confirm button
Note: You cannot reduce to less than the currently used capacity.
9.9 Adding and Reducing User Seats
Note: This feature is only available in paid plans of the cloud version.
Adding User Seats
- Click the Add Seats button
- The Add Seats dialog appears
- Select the number of users to add
- Review the pricing
- Click the Purchase button
Reducing User Seats
- Click the Reduce Seats button
- The Reduce Seats dialog appears
- Select the reduced user count
- Click the Confirm button
Note: You cannot reduce to fewer users than the current member count.
9.10 Upgrading Your Plan
Note: This feature is only available in the cloud version.
You can upgrade to a higher plan. Note that how to apply for an upgrade differs by plan.
How to Upgrade by Plan
| Plan | Description | How to Upgrade |
|---|---|---|
| Personal | Plan for individuals | Available only from the client app (you cannot upgrade from the Web UI (browser)) |
| Team | Team plan. Sharing and group features available | Available only from the Web UI (browser) (not available from the app) |
| Business | Business plan. All features available | Available only from the Web UI (browser) (not available from the app) |
| Enterprise (dedicated server) | Enterprise plan. Customization available | Cannot be applied for from the Web UI or the app. Please contact our sales team |
Upgrade Procedure (Team / Business)
- Click the Upgrade button for your desired plan in the Upgrade Your Plan section of the Web UI
-
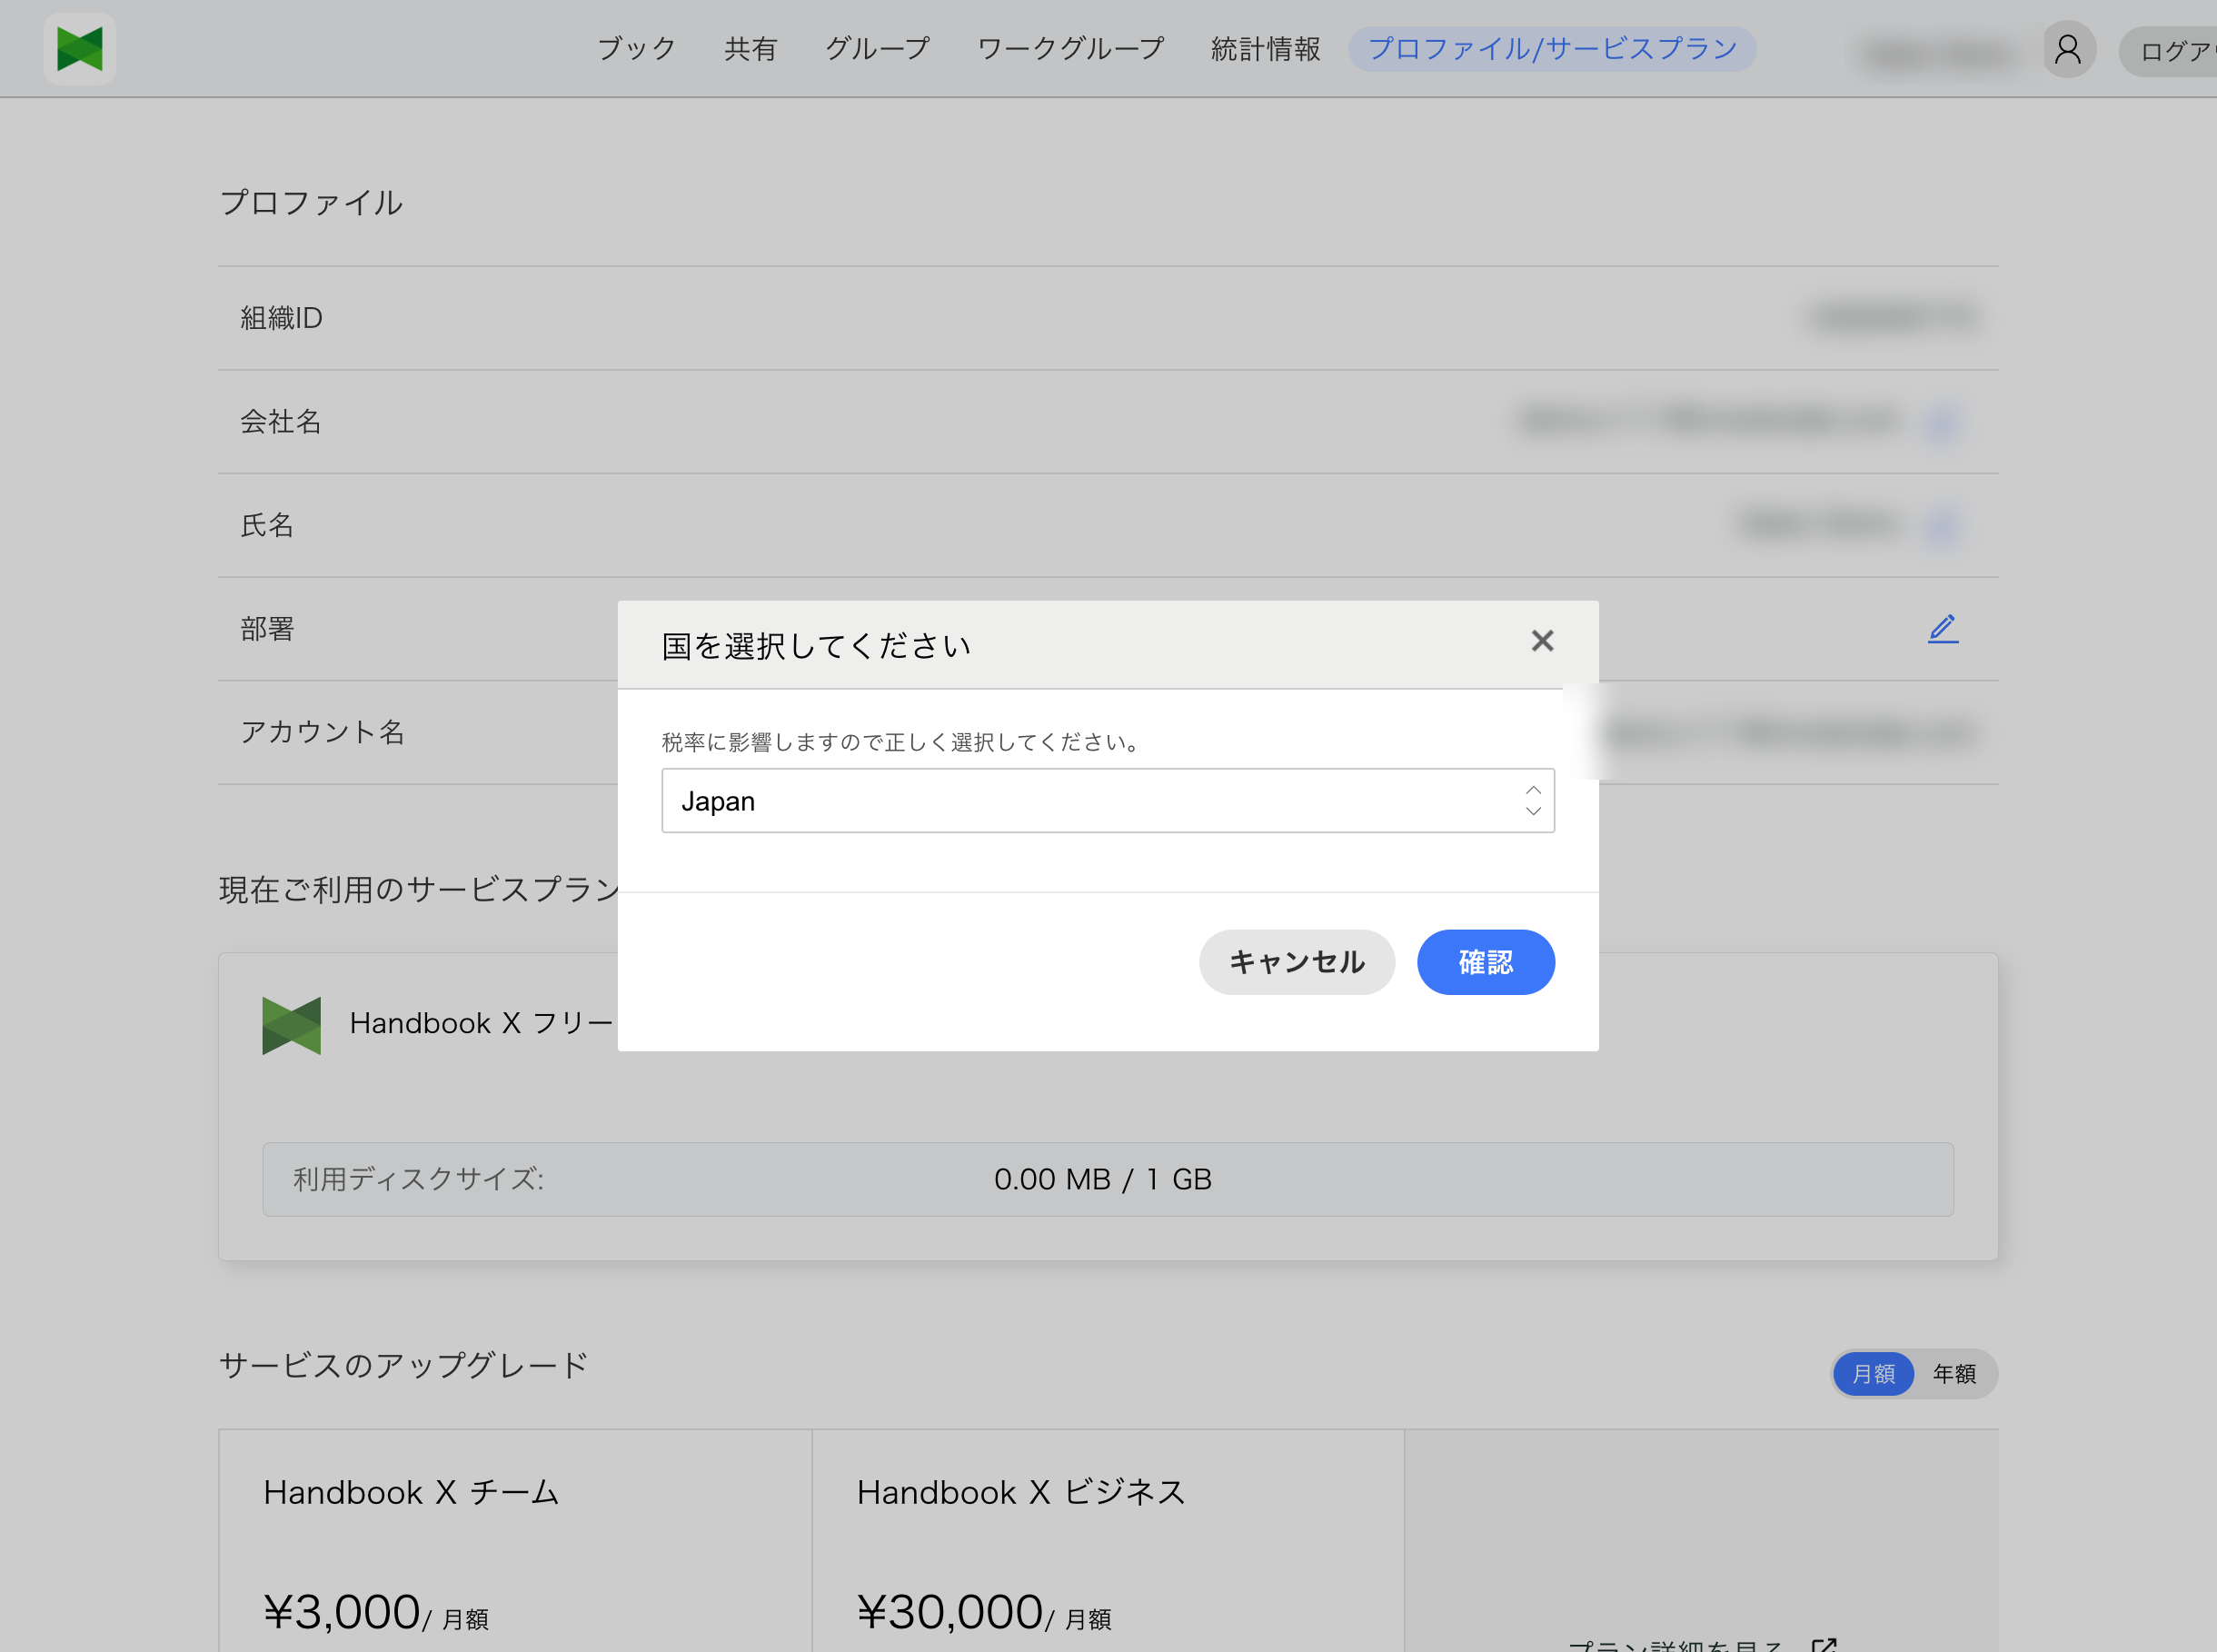
On the first upgrade, the "Please select your country" dialog appears. Select the correct country and click Confirm — the selection is used to calculate the sales tax rate
-
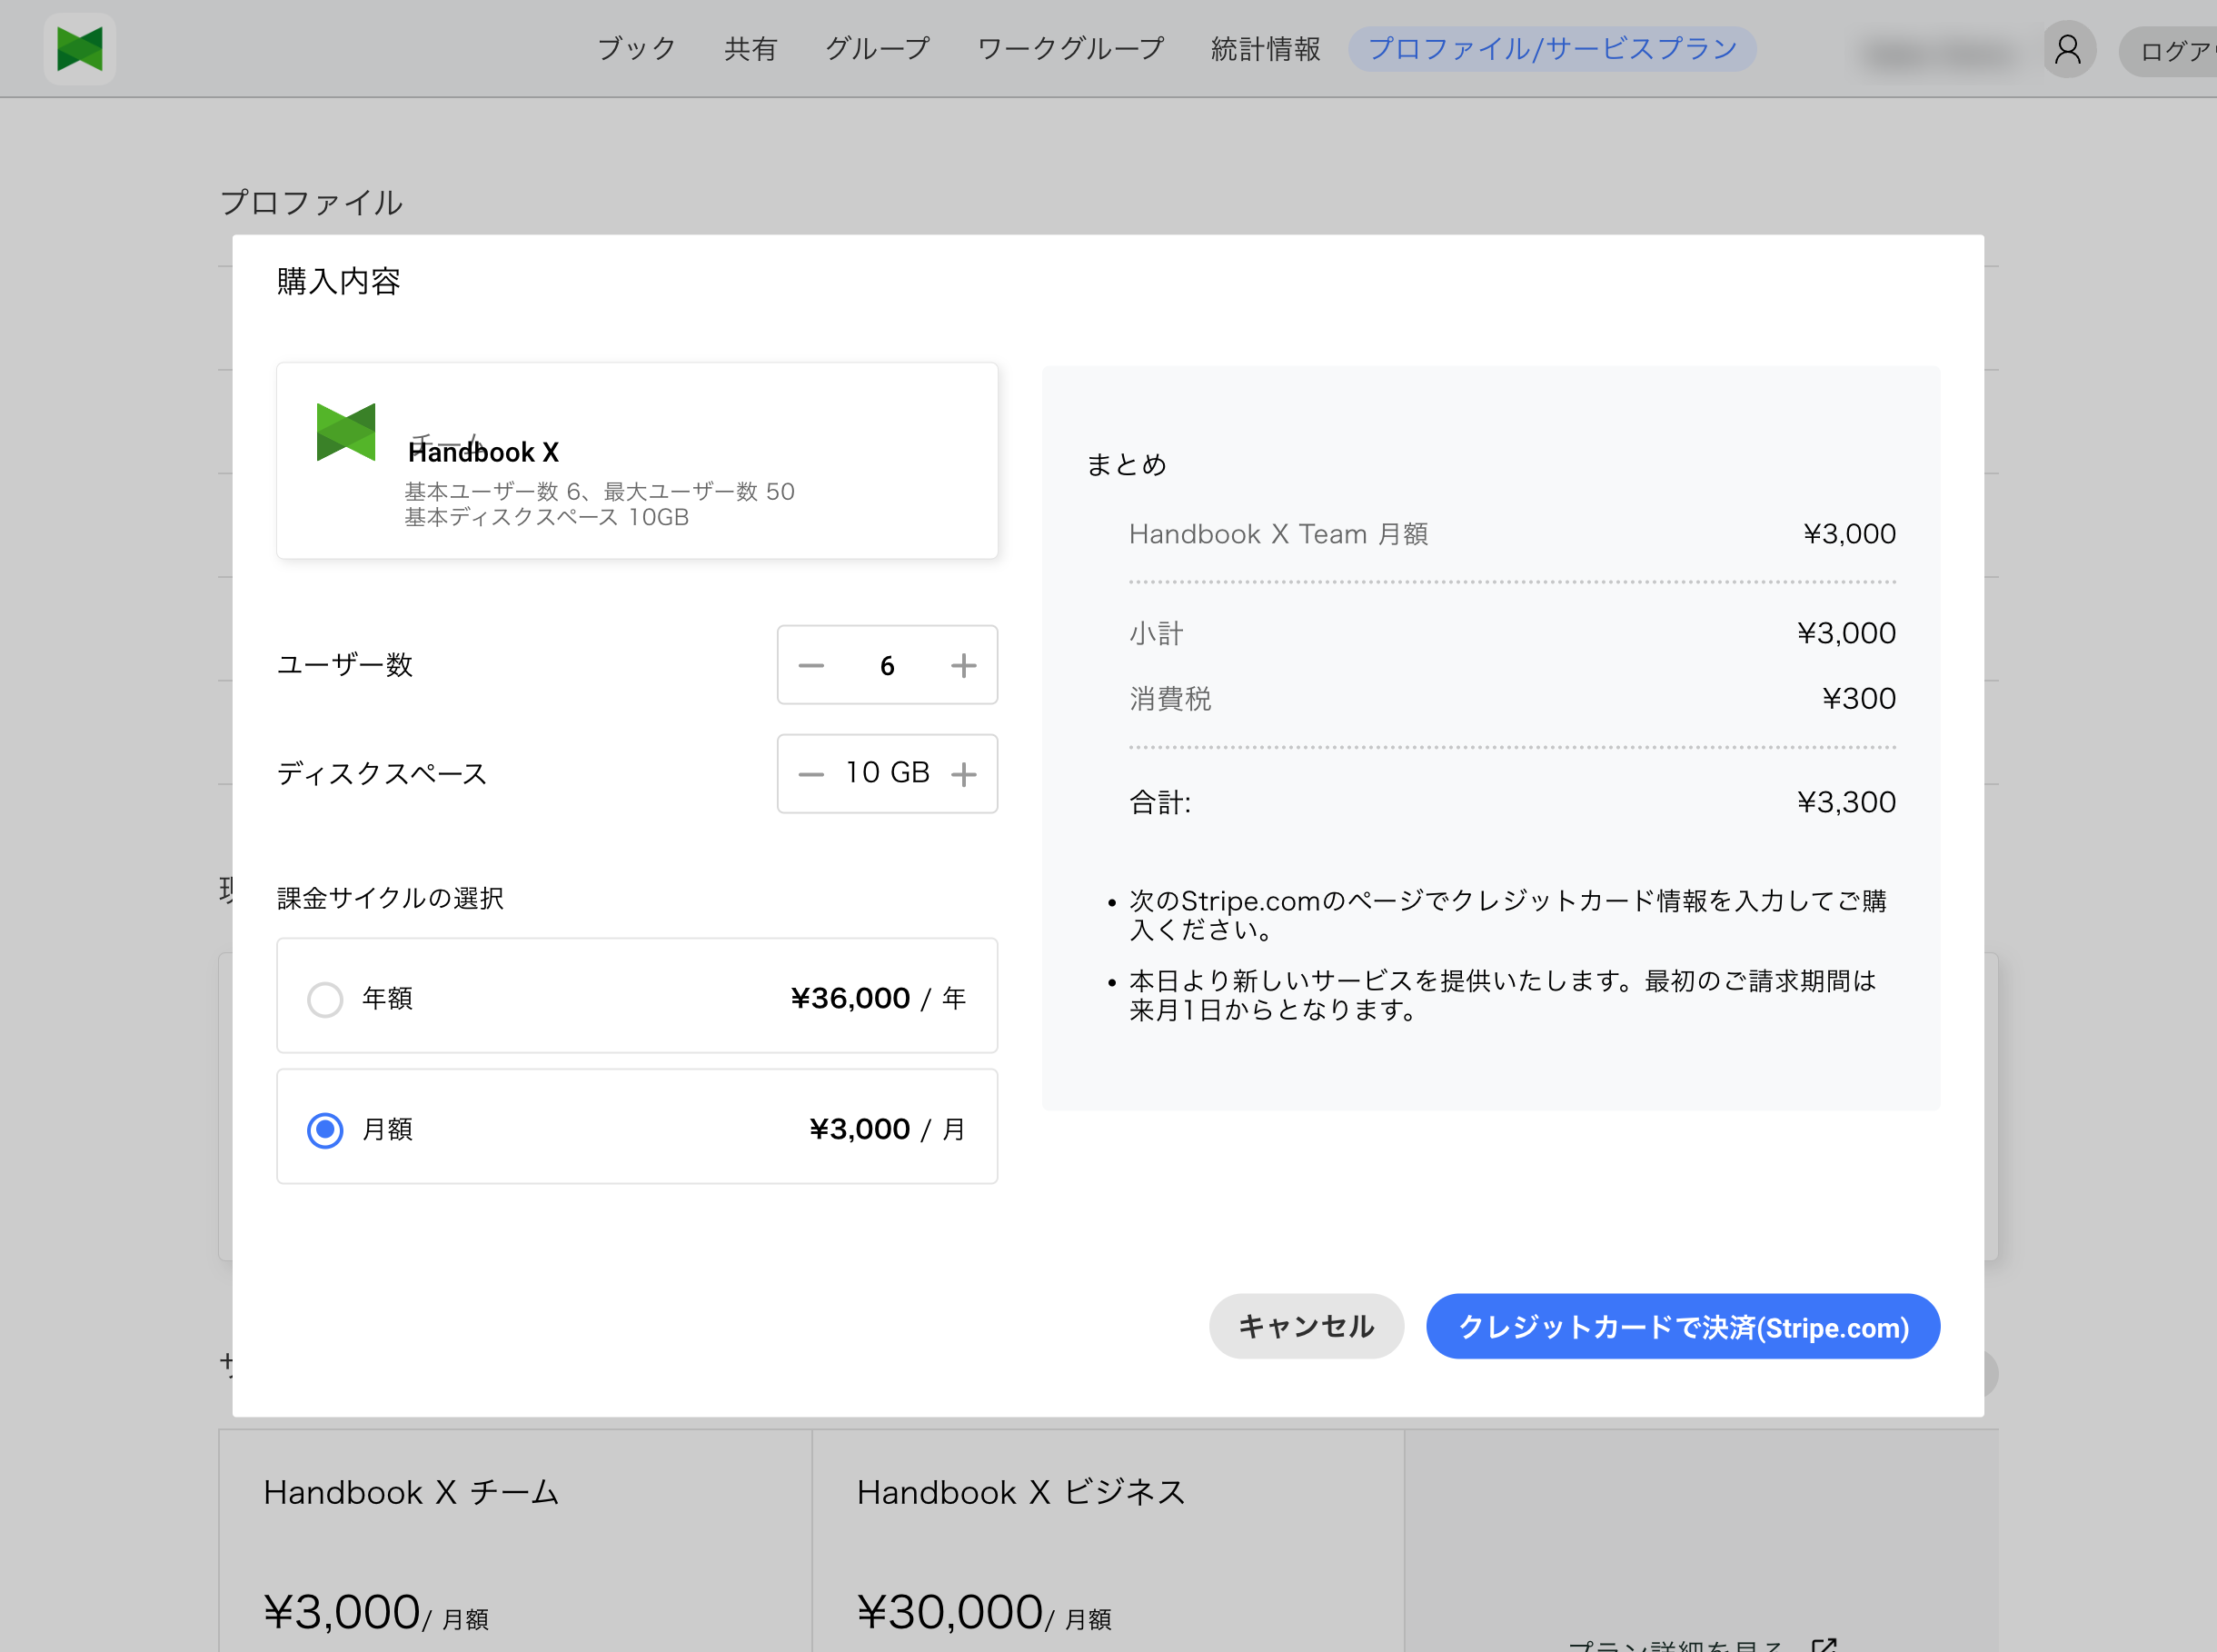
The "Purchase Contents" dialog appears. Adjust the number of user seats and disk space as needed, and select the billing cycle (yearly / monthly). The "Summary" on the right shows the subtotal, sales tax, and total amount
-
Click the Pay by credit card (Stripe.com) button
- You will be taken to the Stripe.com checkout page; enter your credit card information to complete the purchase
Note: Credit card payment via Stripe is the only payment method available from the Web UI. If you prefer another payment method such as bank transfer, please contact our sales team.
Selecting Billing Cycle
- Monthly: Monthly payment
- Yearly: Annual lump-sum payment
Viewing Plan Details
Click the View Plan details link to open a detailed feature comparison page for each plan.
9.11 Canceling Subscription
Note: This feature is only available in paid plans of the cloud version.
To cancel your subscription:
- Click the Cancel Subscription button
- The cancellation confirmation dialog appears
- Select a cancellation reason (optional)
- Click the Cancel button
Behavior After Cancellation
- You can continue using the service until the end of the current contract period
- After the contract period ends, you will be moved to the Free plan
- Data is preserved, but capacity limits will apply
9.12 Invoice
Note: This section is displayed only when invoices exist from plan purchases made in the Web UI (credit card payment via Stripe). It is not shown if you have never made a purchase.
The Invoice section allows you to view past invoices.
Display Items
| Item | Description |
|---|---|
| Invoice No | Invoice number |
| Invoice Date | Date the invoice was issued |
| Amount(Tax Included) | Invoice amount including tax |
Downloading Invoices
Click the View&Download button on an invoice to view or download it.
9.13 Technical Contact
Note: This feature is only available in paid plans (Team/Business/Enterprise).
A link to contact support is displayed.
- Click the Open Support Site button
- The support portal opens in a new tab
- You can submit questions or report issues through the contact form